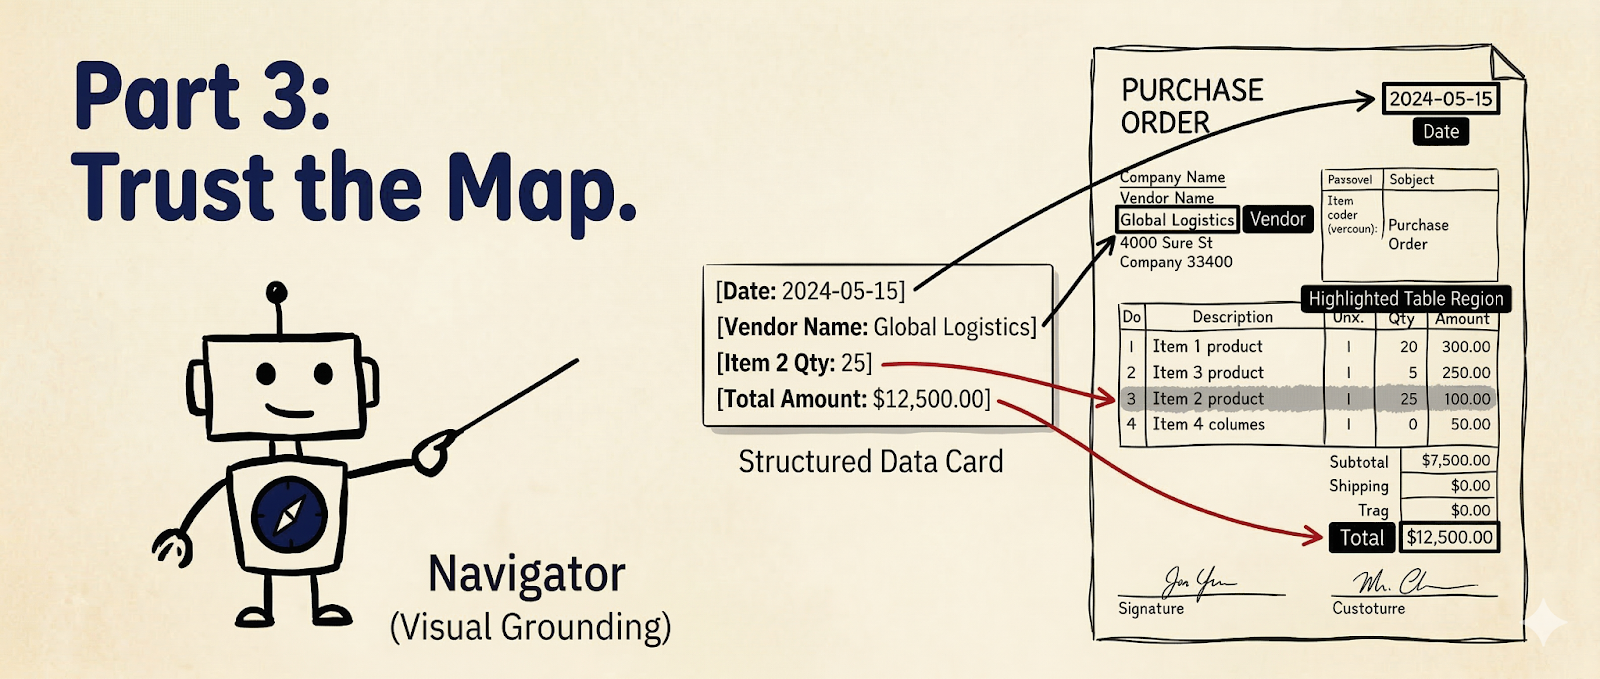
Trust the Map: Mastering Visual Grounding
In Parts 1 and 2, you learned Parsing (turning pixels into markdown), Extracting (pulling specific data out using a schema), and Splitting (sorting the documents according to categories).
But what if you need to trace where that data came from? What if you want to build a UI that highlights the exact "Total Amount" on the original PDF for human review?
To do that, you need to master The Navigator—Visual Grounding.
1. Understanding Parse Output
In part one, we learned about the most important part of the parse output: response.markdown.You might only need the .markdown for a simple summary, but the response also contains other four key fields.
To understand how the parser works, let's look at the absolute simplest example: a receipt containing just one sentence ("Total: $500.00").
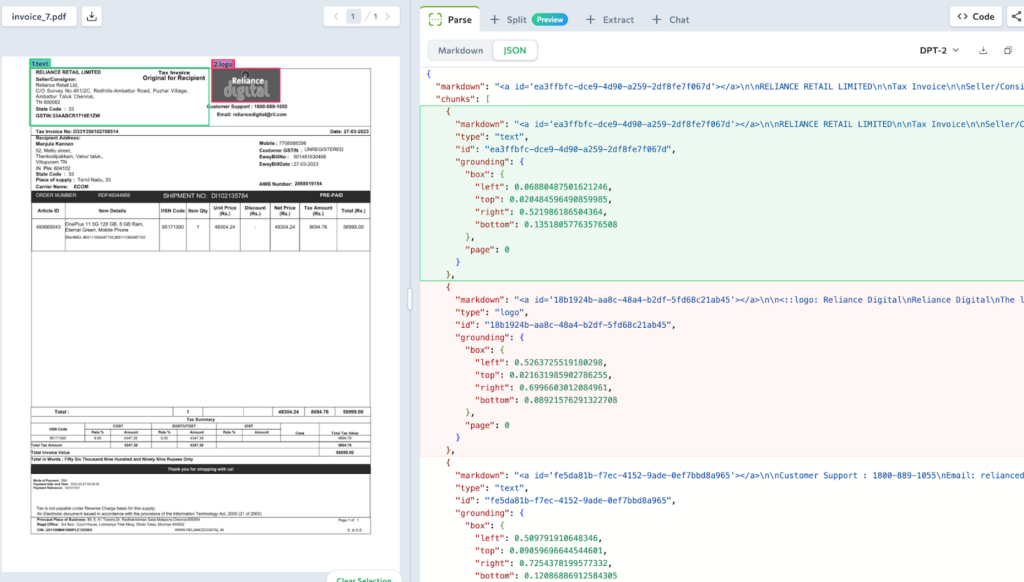
1. The markdown String
The raw, readable text. Notice the HTML anchor tag —this is the unique id of each content block.
"markdown": "<a id='chunk_1'></a>Total: $500.00"2. The chunks List
The detailed building blocks of the document. Every piece of text, table, or image gets its own chunk ID, type, and location data right inside the list.
"chunks": [
  {
    "id": "chunk_1",
    "type": "text",
    "markdown": "<a id='chunk_1'></a>Total: $500.00",
    "grounding": {
      "box": {"left": 0.10, "top": 0.20, "right": 0.40, "bottom": 0.25},
      "page": 0
    },
  }
]
3. The splits List
The pagination. If you only want to process page 3 of a 50-page document, this tells you exactly which chunks belong to which page.
"splits": [
  {
    "class": "page",
    "identifier": "page_0",
    "pages": [0],
    "markdown": "<a id='chunk_1'></a>Total: $500.00",
    "chunks": ["chunk_1"]
  }
]
4. The grounding Dictionary
The Navigator's Map. When your Extractor finds the answer in "chunk_1", you can do an instant, O(1) lookup in this dictionary to find exactly where to draw your bounding box.
"grounding": {
  "chunk_1": {
    "box": {"left": 0.10, "top": 0.20, "right": 0.40, "bottom": 0.25},
    "page": 0,
    "type": "chunkText"
  }
}
5. The metadata Dictionary
This tracks information such as the processing time, the original filename, and how many credits the operation consumed.
Deep Dive: Why is grounding data in two places?
You will see grounding coordinates inside chunks[] list and in the separate grounding{} dictionary.
chunks[].grounding:This is for convenience. When you are looping through chunks to read text, the location is right there with you if you want to save each chunk as a separate image. No lookups needed. See Sample Workflow ->grounding{}:This is for speed. If you have a chunk ID (from an extraction result) and need to find its location in the parse output, this lookup table is O(1) fast. See Sample Workflow ->
2. Understanding Extraction Output
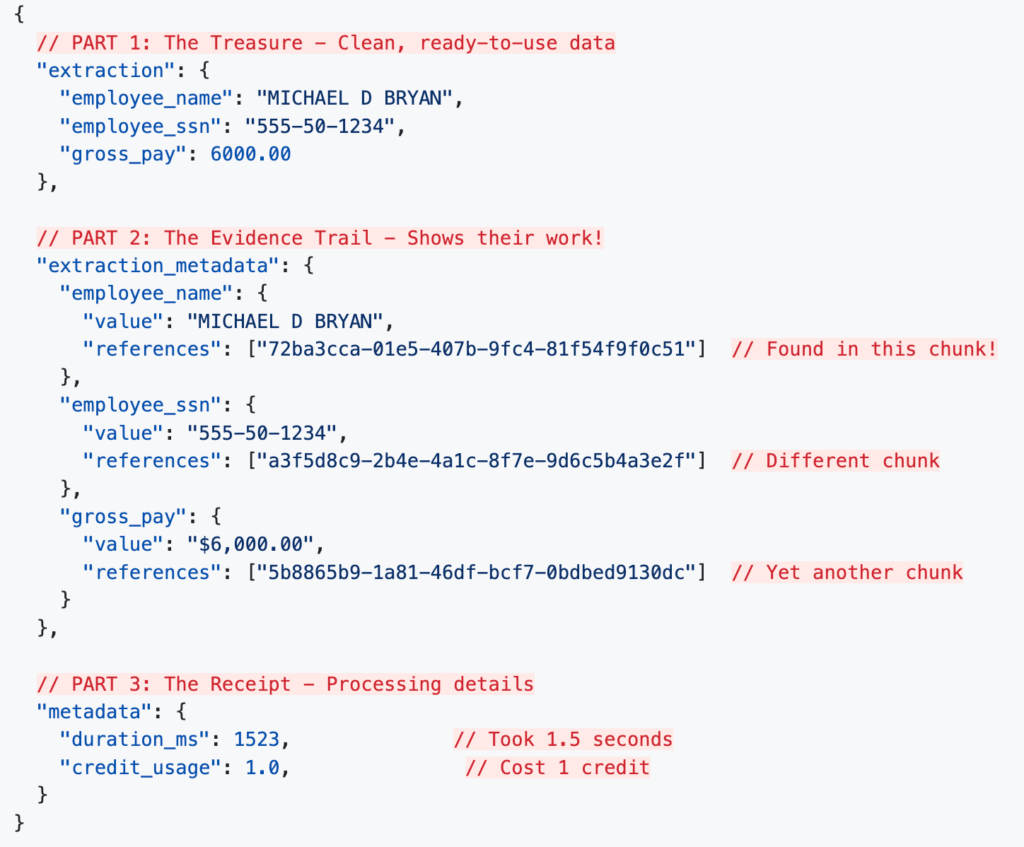
When you run an extraction, you get three components:
.extraction: The clean, structured data you pulled out.
.extraction_metadata: The trail linking that data back to grounding info in the parse output.
.metadata: Processing details like duration and credit cost.
Real Example: Extracting from a Pay Stub
3. Connecting the Dots
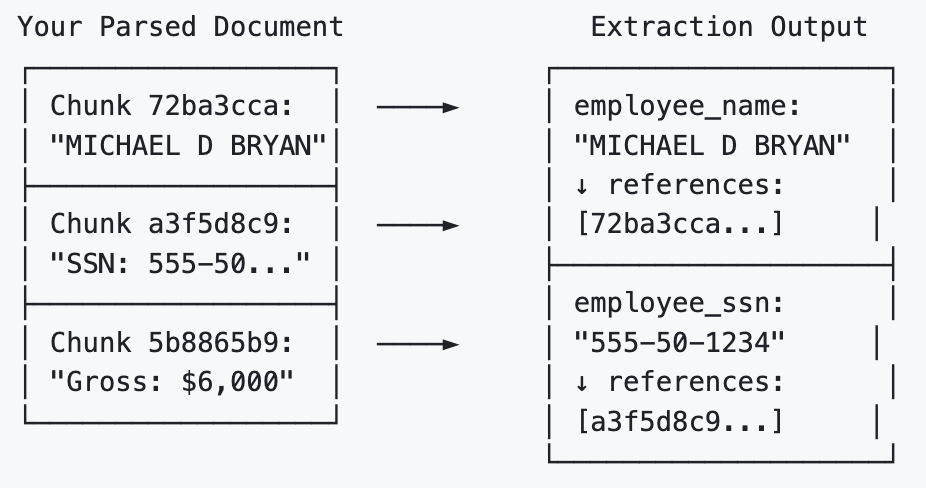
To bring it all together, we need to bridge the gap between the Extractor (which gives us the data) and the Parser (which holds the map).
The Extractor doesn't clutter your clean JSON data with bounding box coordinates. Instead, it leaves a trail of reference in the .extraction_metadata object. For every field it extracts, it lists the specific Chunk IDs it used to find that answer.
To find the exact pixel location on the original document, you simply take the Chunk ID from the extraction metadata and look it up in the parser's .grounding dictionary.
Here is how you execute this "Map Lookup" in Python if you want to find out where the "employee_name" is in the original document:
# Assume you have already run client.parse() and client.extract()
# parse_response = client.parse(...)
# extract_response = client.extract(...)

# 1. Grab the chunk ID from the extraction's reference trail
chunk_id = extract_response.extraction_metadata["employee_name"]["references"][0]

# 2. Look up that exact ID in the parser's map
grounding = parse_response.grounding[chunk_id]

print(f"Page: {grounding.page}")
print(f"Coordinates [left, top, right, bottom]: {grounding.box}")

# From here, you can pass these coordinates to your frontend UI
# or use a library to draw a highlight box on the original PDF!
4. Drawing the Map (Highlighting Data on the Document)
To do this, there is one key concept to understand about how ADE maps documents: Normalized Coordinates.
When you retrieve grounding.box from the parser, the numbers you get for left, right, top, and bottom are not absolute pixel values (like 450px). Instead, they are decimals between 0.0 and 1.0 representing a percentage of the page.
Why does ADE do this? Because it makes your map resolution-independent! Whether your frontend UI is rendering a tiny thumbnail or a massive 4K scan of the document, the coordinates remain perfectly accurate.
To draw the box, you simply multiply those decimal percentages by the actual width and height of the image you are currently displaying.
Here is how you can write a quick script using Python's Pillow (PIL) library to draw a bold red rectangle right over the extracted data, See Sample Workflow -> :
from PIL import Image, ImageDraw

# 1. Load your original document image
page_image = Image.open("paystub_page_1.png")
draw = ImageDraw.Draw(page_image)

# 2. Get the bounding box we found above
box = grounding.box

# 3. Convert normalized coordinates (0.0 - 1.0) to exact pixel coordinates
# We do this by multiplying the decimal by the image's total width or height
left = int(box['left'] * page_image.width)
right = int(box['right'] * page_image.width)
top = int(box['top'] * page_image.height)
bottom = int(box['bottom'] * page_image.height)

# 4. Draw a bold red rectangle to highlight the Employee!
draw.rectangle([left, top, right, bottom], outline="red", width=4)

# Show the final result on your screen
page_image.show()
Victory: The Full Stack Document Master
Congratulations! You have successfully mastered the core Agentic Document Extraction workflow. You now have the power to:
Parse: Translate any document into machine-readable Markdown.
Split: Automatically sort jumbled, multi-document PDFs into logical categories.
Extract: Use strict schemas to pull the exact data you need.
Navigate: Prove exactly where that data came from by mapping it back to the original document.
Highlight: Draw precise bounding boxes directly on the original document for human verification.
You are no longer just extracting data; you are building traceable, automated, and visually grounded document pipelines.
Coming Up Next:
You have mastered the How (Parsing), the What (Extraction), the Which (Splitting), and the Where (Visual Grounding).
But what happens when your data is trapped inside a massive, multi-page financial grid?
In the next chapter, "Taming the Data Grid," we will reveal how to handle the final boss of document extraction: complex tables. We will show you how ADE automatically understands structural hierarchy so you can effortlessly navigate rows, columns, and merged cells without losing your mind—or your data. Stay tuned!