1. The Problem
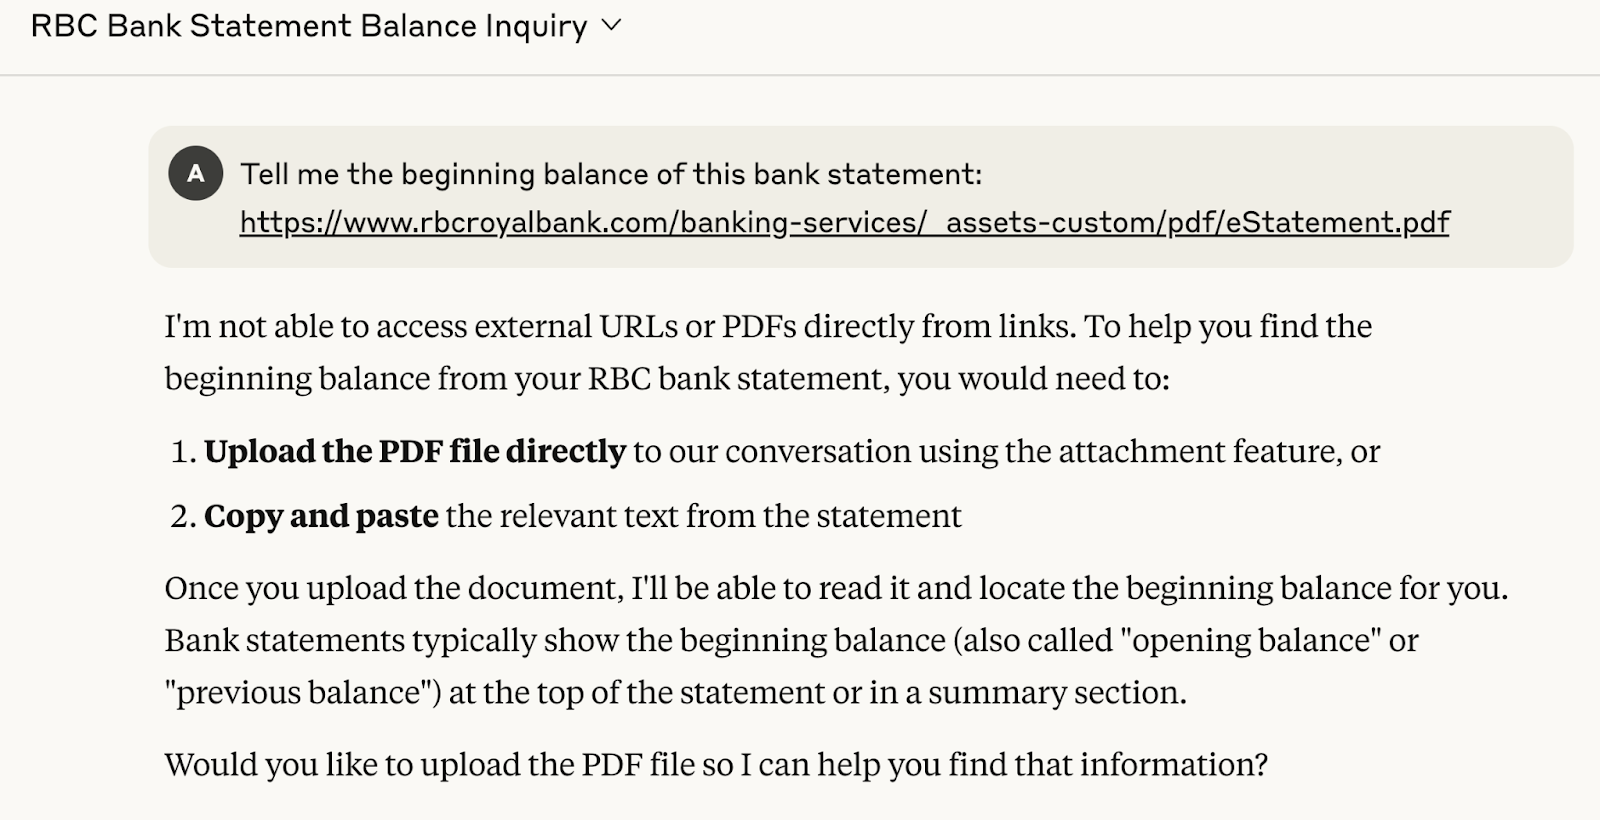
Ask an AI assistant to analyze a document, only to hear: “I can’t access external URLs or PDFs, please upload the file”? BTW, that dead-end isn’t random, it’s by design. LLMs run in a sandbox with no direct access to your filesystem or enterprise repositories. Without a bridge, they can’t open a PDF, preserve its layout, or verify where an answer came from.
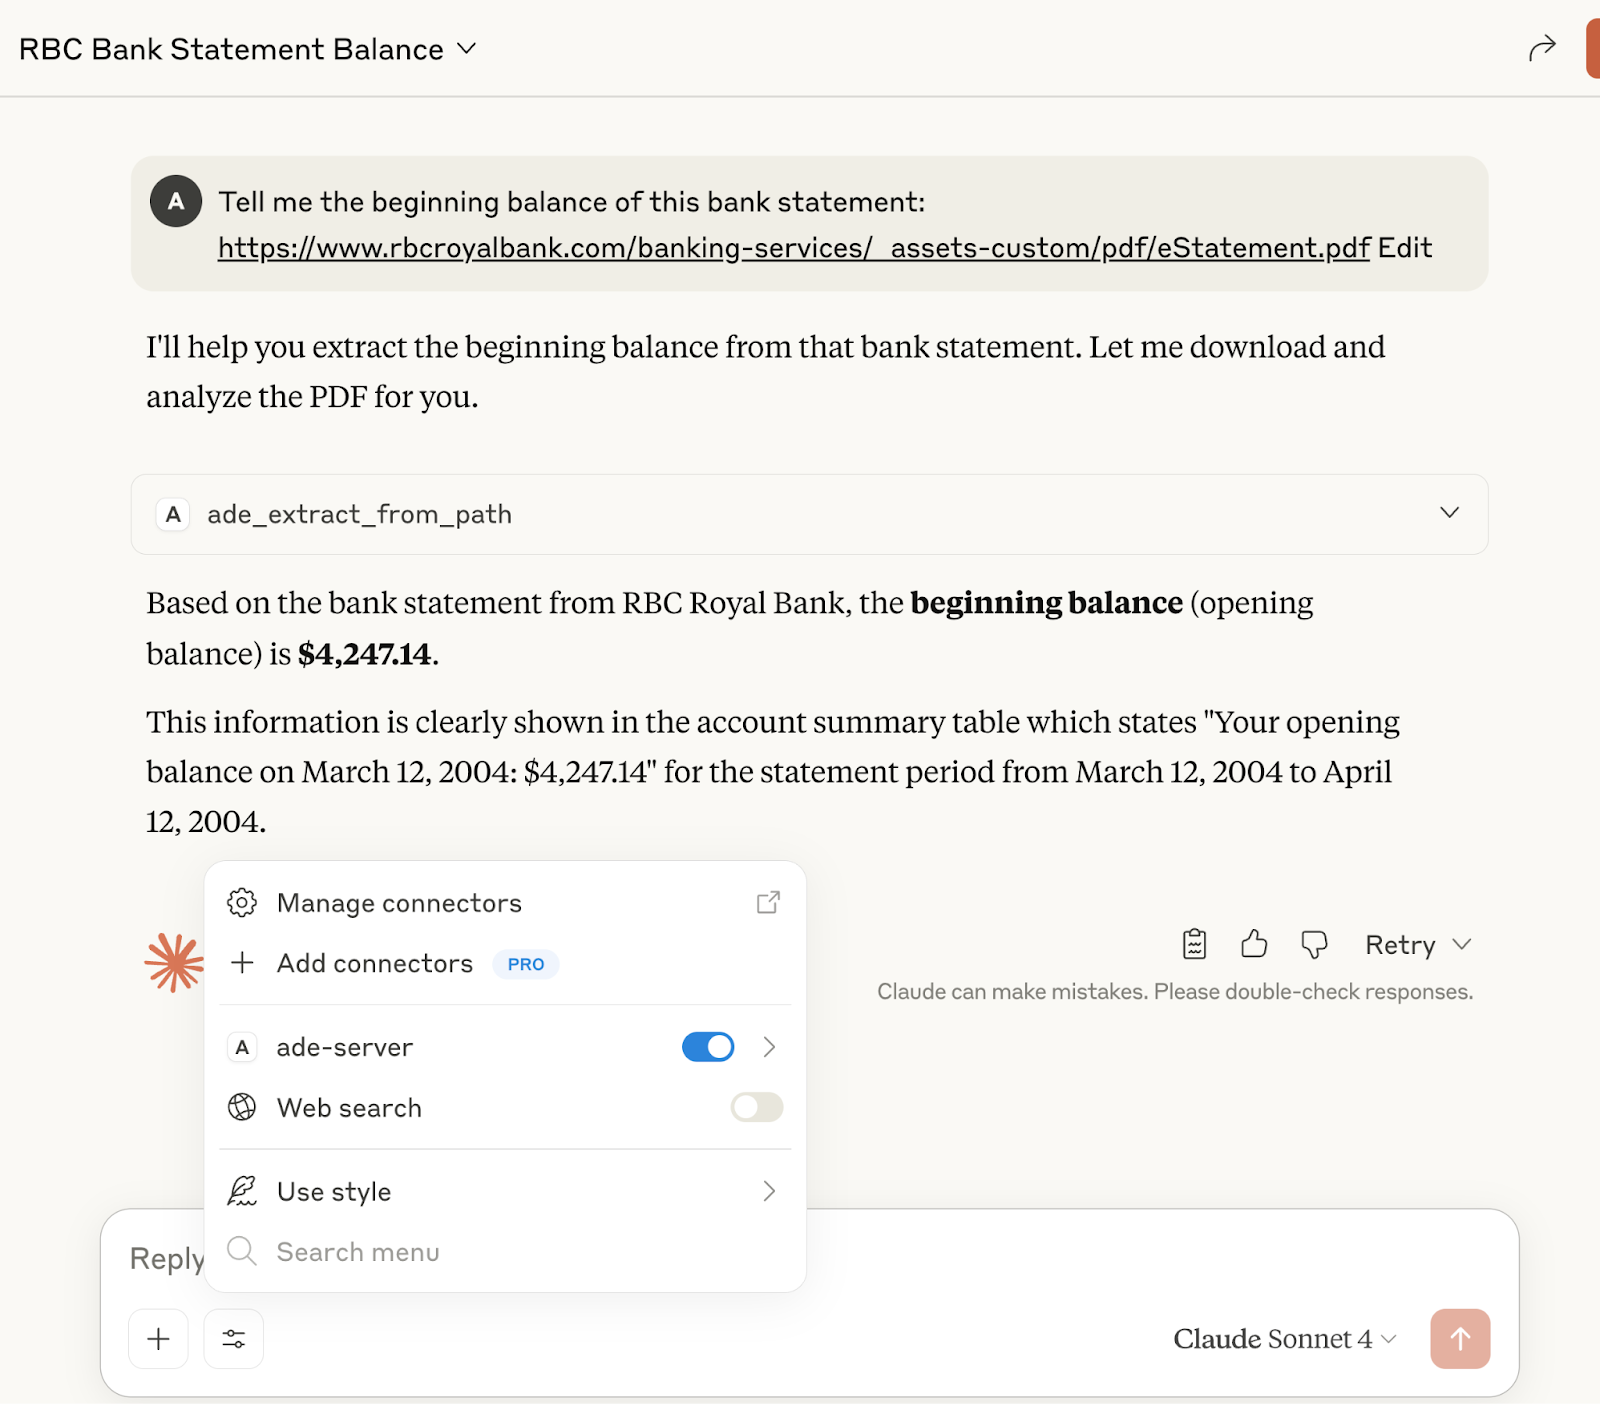
Now imagine the opposite: the assistant calls a tool, opens the document securely, and replies with “The opening balance is $4,247.14 on page 1.” Even better, it shows the highlighted box in the PDF where that figure lives. You get not just an answer, but proof of origin (Visual Grounding).
This is the leap the Model Context Protocol (MCP) enables. If you haven’t already, check out our previous blog post to understand how MCP works.
MCP acts as a bridge, connecting tools like LandingAI’s Agentic Document Extraction (ADE) to empower AI agents with actionable capabilities. ADE doesn’t just parse text, it understands layout, structure, and grounds the extracted value back to its source coordinates on the page.
In this guide, we’ll build a minimal Python MCP server that exposes ADE as a first-class tool. By the end, you’ll have a real agentic AI system that won’t just summarize documents but also fetch relevant chunks from your documents to visually ground the answers.
2. Two Ways to Get Started
2.1 Pre-Built MCP Server: The Fast Lane
If your main goal is to get a functional ADE server up and running as quickly as possible, starting with a pre-built solution is your best bet. This approach is perfect for developers who need to integrate ADE into an existing project without delay.
Pros: Instant setup, production-tested code, and less time spent on debugging boilerplate.
Best for: Developers who want a quick, reliable solution.
You can use this pre-built MCP server for ADE.
2.2 Build Your MCP Server from Scratch: The Learning Path
You’d learn the best if you build your own MCP server. This guide is designed to walk you through this process, ensuring you grasp every concept along the way.
3. MCP Mini Workshop
Before we dive into the main project, let’s cover the fundamentals. This mini-workshop will give you the essential knowledge and tools you need to build MCP servers starting out.
3.1 Writing MCP Code: A Recommended Workflow
Following a structured workflow can save you hours of debugging. Here is a battle-tested process:
Read the API Docs First (Always!): Before writing a single line of code, understand the API you’re using. What authentication does it need? What are the exact inputs (file formats, JSON structure)? What does the output look like? This is the most crucial step.As we are about to build our MCP server for LandingAI’s Agentic Document Extraction (ADE), delve into the official ADE documentation. It provides essential details on how the service works.
Isolate and Test Your Core Logic: Write the code that calls the API in a separate, simple Python script. Make sure you can successfully send a request and get a response before you put it inside a server.
Use a Boilerplate: Start with a clean server template (like the one below). This handles the basic server setup for you.
Integrate and Connect: Place your tested API logic into the boilerplate. Connect the user inputs from your MCP tool to your core logic function.
Format and Return: Ensure the final output is a clean, predictable JSON string, and add error handling to manage unexpected issues gracefully.
3.2 MCP Quickstart– All You Need Boilerplate
You don’t need to write an MCP server from scratch every time. You can create a simple template, or “boilerplate,” and adapt it for different APIs. Here is a great boilerplate for a FastMCP tool.
# 1. ===== IMPORTS =====
# Basic imports you’ll almost always need.
from mcp.server.fastmcp import FastMCP, Context
from dotenv import load_dotenv
import os
import json

# 2. ===== CORE LOGIC (The part you’ll change) =====
# This is a placeholder for your API-specific logic.
# It’s a good practice to keep it separate from the server code.
def my_api_wrapper(some_input: str) -> dict:
    “””
    This function handles the actual call to the third-party API.
    “””
    # In a real scenario, you’d make an API call here.
    print(f”Calling the API with: {some_input}”)
    # We’ll just return a dummy response.
    api_result = {“status”: “success”, “data”:some_input.upper()}
    return api_result

# 3. ===== MCP SERVER SETUP =====
# This part stays mostly the same.
mcp = FastMCP(“my-cool-server”)

@mcp.tool()
async def my_tool(ctx: Context, user_input: str) -> str:
    “””
    My new tool that uses the API wrapper.
    The docstring here becomes the tool’s description!
    “””
    try:
        # 4. ===== INTEGRATION =====
        # Call your core logic with the input from the user.
        result = my_api_wrapper(user_input)

        # Format the result into a JSON string to send back.
        return json.dumps(result, indent=2)

    except Exception as e:
        # Basic error handling is always a good idea.
        error_message = {“error”: str(e)}
        return json.dumps(error_message, indent=2)

# 5. ===== RUN THE SERVER =====
# This is the entry point to start your server.
if __name__ == “__main__”:
    # You could load environment variables here, e.g., load_dotenv()
    print(“Starting MCP server...”)
    mcp.run(transport=’stdio’)
4. Let’s Get Building: The ADE Server
Now it’s time for the main event! We will build the multi-tool MCP server for LandingAI’s ADE. This server will be a powerful utility capable of handling various document extraction tasks.
4.1 Prerequisites
Before we start, make sure you have the following:
Step 1: Get a LandingAI Account and API Key
You will need a LandingAI API key to use the ADE service. You can follow the official step-by-step guide to obtain one.
Step 2: Install Python and uv
Ensure Python is installed on your system. We will also use uv, a fast and efficient Python package manager that simplifies project dependency management.
Installing uv
- macOS / Linux:
curl -LsSf https://astral.sh/uv/install.sh | sh- Windows (PowerShell)
powershell -ExecutionPolicy ByPass -c "irm https://astral.sh/uv/install.ps1 | iex"📖 For complete installation instructions, see the official uv documentation.
Step 3: Set Up the Project Directory
Open your terminal and run the following commands to create and navigate into a new project directory.
mkdir mcp-ade-server
cd mcp-ade-server
Step 4: Initialize the Project with uv
Next, initialize a new Python project. This command automatically creates a virtual environment and project configuration.
uv initStep 5: Install Required Packages
Install the necessary packages using uv:
agentic-doc is required for LandingAI’s ADE functionality
mcp is required for the MCP server framework
uv add agentic-doc mcpStep 6: Set Up Environment Variables
Create a new file named .env in your project’s root directory. Add your LandingAI API key to this file, replacing the placeholder text:
VISION_AGENT_API_KEY="<your-landingAI-api-key>"Important: The variable name must be VISION_AGENT_API_KEY for the tool to work correctly.
Step 7: Create the MCP Server Script
In the project directory, create a new Python file named mcp_ade_server.py. This is where the server code will go.
4.2 Code-Along Step-by-Step Guide
Now that you have the prerequisites, let’s start building the server. We’ll break down the code block by block so you can understand how it all connects.
Anatomy of the MCP Server Script
Before pasting the full code, let’s break down the key components.
Imports: At the top of the script, we import necessary libraries. FastMCP is the core of our server, and the @mcp.tool() decorator is what turns a Python function into a tool the AI can call.
Server Initialization: The line mcp = FastMCP(“ade-server”, …) creates a new server instance. The name “ade-server” is a crucial identifier—it’s what you’ll use in your AI assistant’s configuration to tell it which server to connect to.
Tool Definition: Any function decorated with @mcp.tool() becomes an available tool. The function’s name (e.g., ade_extract_from_path) becomes the tool’s name, and its parameters (e.g., path: str) become the tool’s arguments.
Main Execution Block: The if name == “main”: block is standard Python practice. It ensures the mcp.run() command, which starts the server, only executes when you run the script directly.
The Complete Recipe
Step 1: The Foundation – Imports and Configuration
First, import all the necessary libraries and set up the environment.
from typing import Any, AsyncIterator, Optional, Dict, List, Union
from mcp.server.fastmcp import FastMCP, Context
from dotenv import load_dotenv
import os
import json
import base64
from dataclasses import dataclass
from contextlib import asynccontextmanager
import sys
import asyncio
from pydantic import BaseModel, Field

# CRITICAL: Import agentic-doc with stdout suppressed to prevent config output
old_stdout = sys.stdout
sys.stdout = open(os.devnull, 'w')
try:
    from agentic_doc.parse import parse
    from agentic_doc.common import ParsedDocument
    from agentic_doc.config import ParseConfig
finally:
    sys.stdout.close()
    sys.stdout = old_stdout
Standard Libraries: We import modules like typing (for type hints), os (for operating system interactions), json (for data formatting), base64 (for encoding/decoding files), sys (for system-level operations), and asyncio (for running code asynchronously, which makes our server fast and responsive).
MCP and Pydantic: We import FastMCP which is the core of our server, and BaseModel from Pydantic which helps us define data structures.
The agentic-doc Import: This is a very important part of the code! The agentic-doc library can sometimes print configuration messages when it’s imported. To keep our server’s logs clean, the code temporarily redirects the system’s output (sys.stdout) to a null device, imports the library, and then restores the output. This ensures a silent, clean import.
Step 2: Helper Classes and Functions
Next, we have a context manager and helper functions that make the main logic cleaner and more readable.
class SuppressOutput:
    """A context manager to suppress stdout and stderr."""
    def __enter__(self):
        self.old_stdout = sys.stdout
        self.old_stderr = sys.stderr
        sys.stdout = open(os.devnull, 'w')
        sys.stderr = open(os.devnull, 'w')

    def __exit__(self, exc_type, exc_val, exc_tb):
        sys.stdout.close()
        sys.stderr.close()
        sys.stdout = self.old_stdout
        sys.stderr = self.old_stderr
def _format_raw_response(result: ParsedDocument) -> Dict[str, Any]:
    """Helper function to format the raw chunk extraction response."""
    return {
        "markdown": result.markdown,
        "chunks": [
            {
                "type": chunk.chunk_type.value if hasattr(chunk, 'chunk_type') and hasattr(chunk.chunk_type, 'value') else str(chunk.chunk_type),
                "content": chunk.text,
                "page": chunk.grounding[0].page if chunk.grounding else None,
                "chunk_id": chunk.chunk_id,
                "grounding": [{"bbox": {"l": g.box.l, "t": g.box.t, "r": g.box.r, "b": g.box.b}, "page": g.page} for g in chunk.grounding] if chunk.grounding else []
            } for chunk in result.chunks
        ]
    }

def load_environment_variables() -> None:
    """Loads environment variables from a .env file."""
    load_dotenv()
    if not os.getenv("VISION_AGENT_API_KEY"):
        raise ValueError("Missing required environment variable: VISION_AGENT_API_KEY")
SuppressOutput Class: This is a more reusable and robust version of the silent import trick we saw earlier. It’s a “context manager” that lets us wrap any block of code to silence its output, which is very useful for keeping our server logs clean when calling the agentic-doc library.
_format_raw_response Function: The ADE library returns a lot of detailed information. This function takes that complex result and formats it into a clean, easy-to-read JSON structure. It pulls out key details like the markdown content, text chunks, and grounding coordinates (bounding boxes).
load_environment_variables Function: This is a crucial security step. It loads your API key from a .env file (which you should keep private) and checks to make sure the key exists. If not, it stops the program with an error. This prevents the server from running without proper credentials.
Step 3: Initializing the MCP Server
Now we get to the heart of the server itself. We define the application’s lifespan and create the main MCP object.
@dataclass
class AppContext:
    pass

@asynccontextmanager
async def app_lifespan(server: FastMCP) -> AsyncIterator[AppContext]:
    yield AppContext()

mcp = FastMCP("ade-server", lifespan=app_lifespan)
app_lifespan: This is a standard pattern in modern Python web frameworks like FastAPI (which FastMCP is built on). It’s a function that manages the server’s startup and shutdown events. In this case, it’s simple, but you could add code here to connect to databases or load models when the server starts.
mcp = FastMCP(…): This is the line that creates our server! We give it a name, “ade-server”, and tell it to use our app_lifespan function to manage its lifecycle.
Step 4: Building the Tools
An MCP server’s power comes from its “tools.” Each tool is a function that can be called remotely. We define a tool using the @mcp.tool() decorator.
Tool 1: Raw Chunk Extraction
This is our most basic tool. It takes an encoded PDF, extracts everything, and returns it.
@mcp.tool()
async def ade_extract_raw_chunks(ctx: Context, pdf_base64: str) -> str:
    """
    Performs basic extraction of all raw text chunks and their metadata from a document.
    """
    try:
        with SuppressOutput():
            results = await asyncio.to_thread(parse, base64.b64decode(pdf_base64))
        if not results: return "❌ No results returned"
        response = _format_raw_response(results[0])
        return json.dumps(response, indent=2)
    except Exception as e:
        return f"Error during raw extraction: {str(e)}"
async def: This tells Python this function is asynchronous, allowing the server to handle other requests while waiting for the extraction to finish.
pdf_base64: str: This is the input. It expects the PDF file to be encoded as a Base64 string, a common way to send files in JSON.
with SuppressOutput(): We use our silencing helper here to keep the call to the parse function quiet.
await asyncio.to_thread(parse, …): The parse function from the ADE library is synchronous. This line cleverly runs it in a separate thread so it doesn’t block our asynchronous server.
base64.b64decode(pdf_base64): We decode the input string back into the raw bytes of the PDF file before sending it to the parser.
return json.dumps(…): The final dictionary is converted into a nicely formatted JSON string to be sent back as the result.
Tool 2: Extract from a File Path
This tool is similar, but it works with local files, which is great for testing.
@mcp.tool()
async def ade_extract_from_path(ctx: Context, path: str) -> str:
    """
    Extracts raw chunks from a single local file path (PDF, image, etc.).
    """
    try:
        with SuppressOutput():
            results = await asyncio.to_thread(parse, path)
        if not results: return "❌ No results returned"

        result = results[0]
        response = {
            "file_path": getattr(result, 'source', path),
            "extraction_result": _format_raw_response(result)
        }
        return json.dumps(response, indent=2)
    except FileNotFoundError:
        return f"❌ File not found: {path}"
    except Exception as e:
        return f"Error during file path extraction: {str(e)}"
The logic is almost identical to the previous tool, but instead of decoding a Base64 string, it simply passes the file path directly to the parse function. It also includes specific error handling for FileNotFoundError.
Tool 3: Advanced Extraction with Pydantic
This is where things get really powerful. This tool lets you define the exact data structure you want to extract using a Pydantic model, which is just a Python class.
@mcp.tool()
async def ade_extract_with_pydantic(ctx: Context, pdf_base64: str, pydantic_model_code: str) -> str:
    """
    Extracts data using a Pydantic model defined in a Python code string.
    The last defined Pydantic BaseModel will be used as the extraction model.
    """
    try:
        # Prepare the code for execution with necessary imports
        full_code = f"from pydantic import BaseModel, Field\nfrom typing import List, Optional\n\n{pydantic_model_code}"

        local_scope = {}
        exec(full_code, globals(), local_scope)
        # Find the last defined Pydantic model in the executed code
        extraction_model = None
        for var in reversed(local_scope.values()):
            if isinstance(var, type) and issubclass(var, BaseModel) and var is not BaseModel:
                extraction_model = var
                break

        if not extraction_model:
            return "❌ No Pydantic BaseModel class found in the provided code."

        config_obj = ParseConfig(extraction_model=extraction_model)
        with SuppressOutput():
            results = await asyncio.to_thread(parse, base64.b64decode(pdf_base64), config=config_obj)
        if not results: return "❌ No results returned from parsing."

        # ... (response formatting) ...
        return json.dumps(response, indent=2)
    except Exception as e:

        return f"Error during Pydantic-based extraction: {str(e)}"
Dynamic Code Execution: This tool takes a string of Python code (pydantic_model_code) as an input. It uses the exec() function to run this code, creating the Pydantic model on the fly.
Finding the Model: It then cleverly inspects the variables that were created and finds the last defined BaseModel class to use for extraction.
ParseConfig: Instead of a simple parse(), it now uses a ParseConfig object, telling the ADE engine exactly what to look for by providing the extraction_model.
Rich Output: The response is much richer. It includes any extraction errors, the final extracted data (as a dictionary), and detailed metadata for each field, like the confidence score and raw text.
Tool 4 & 5: JSON Schema Validation and Extraction
These two tools work as a pair. One validates a JSON schema to make sure it’s correct, and the other uses it for extraction. This is an alternative to Pydantic for defining your desired output structure.
@mcp.tool()
async def ade_validate_json_schema(ctx: Context, schema: Dict[str, Any]) -> str:
    """
    Validates a JSON schema against the rules from the ADE troubleshooting guide.
    """
    # ... (validation logic) ...
@mcp.tool()
async def ade_extract_with_json_schema(ctx: Context, pdf_base64: str, schema: Dict[str, Any]) -> str:
    """
    Extracts specific fields from a document based on a provided JSON schema.
    It is recommended to validate the schema with ‘ade_validate_json_schema’ first.
    """
    try:
        # Quick validation before sending
        validation_result = await ade_validate_json_schema(ctx, schema)
        if "❌" in validation_result:
            return f"Schema validation failed. Please fix the schema before extraction.\n{validation_result}"

        config_obj = ParseConfig(extraction_schema=schema)
        # ... (rest of the extraction logic) ...
ade_validate_json_schema: This is a fantastic helper tool. It contains a set of rules that are specific to the ADE service (e.g., “schema depth cannot exceed 5”). It checks an incoming schema and provides clear feedback if it’s invalid. This saves a lot of debugging time!
ade_extract_with_json_schema: This tool first calls the validator. This is a great design pattern! If the schema is valid, it proceeds. It creates a ParseConfig object, but this time it uses extraction_schema=schema. The rest of the logic is similar to the Pydantic tool.
Step 5: Running the Server
Finally, the last block of code is the entry point that brings everything to life.
if __name__ == “__main__”:
    load_environment_variables()
    mcp.run(transport='stdio')
if name == “main”:: This is standard Python practice. The code inside this block only runs when you execute the script directly.
load_environment_variables(): First, it calls our function to load the API key.
mcp.run(transport=’stdio’): This command starts the MCP server. The transport=’stdio’ means it will listen for requests from standard input and send responses to standard output, a common way to run MCP services in a controlled environment.
And there you have it! A complete, powerful, and well-designed MCP server for all your document extraction needs.
4.3 Complete Code Snippets
If you prefer to see the finished product all at once or want to double-check your work, you can find the complete, final code in our GitHub repository.
4.4 Coding Suggestions
As promised, here are a few suggestions regarding the code and setup.
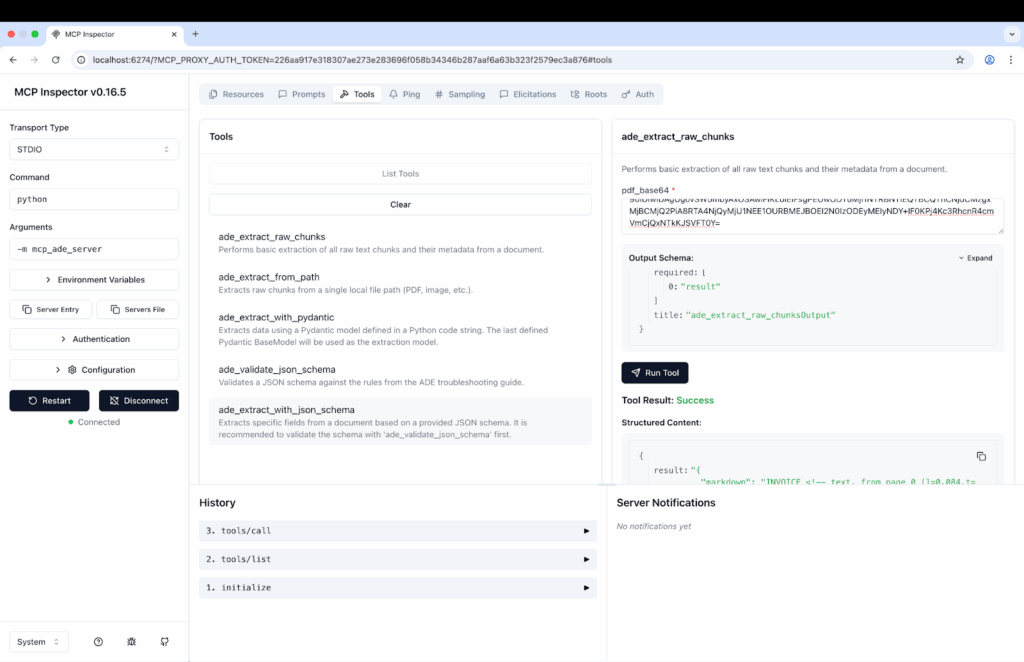
1. Debugging with the MCP Inspector
Before connecting to Claude, it’s a good idea to test your server. The MCP Inspector is a command-line tool that lets you interact with your server directly, making it easy to debug and verify that your tools are working correctly.
- Install the Inspector:
npm install -g @modelcontextprotocol/inspector2. Run Your Server with the Inspector: From your project directory (with your virtual environment activated), run:
mcp-inspector uv run mcp_ade_server.pyThis will launch a web interface where you can see your available tools, send test requests, and inspect the JSON responses in real-time. You can test your tools in a UI as the following:
Once your server is running, you’ll be able to test these powerful capabilities
2. Add .env to .gitignore
This is a crucial security practice. Your .env file contains your secret API key. To prevent it from ever being accidentally committed to a public repository like GitHub, create a .gitignore file in your project’s root directory and add .env to it.
Example .gitignore:
# Environment variables
.env

# Python virtual environment
.venv
This tells Git to ignore these files, keeping your secrets safe.
5. Connecting the Server to Claude Desktop
First, install Claude Desktop if you haven’t already.
Next, open the Claude Desktop App configuration file. You can use any text editor.
- macOS / Linux:
code ~/Library/Application\ Support/Claude/claude_desktop_config.json- Windows
code $env:AppData\Claude\claude_desktop_config.jsonIn the configuration file, add the following JSON block. Remember to replace the placeholders with the absolute paths on your system.
“ade-server”: This must match the name you set in your Python file: mcp = FastMCP(“ade-server”, …).
“command”: This must be the absolute path to your uv executable.
“args”: This must contain the absolute path to your project directory and the name of your Python script.
“args”: This must contain the absolute path to your project directory and the name of your Python script.
Example: macOS / Linux
{
    "mcpServers": {
        "ade-server": {
            "command": "/ABSOLUTE/PATH/TO/uv",
            "args": [
                "--directory",
                "/ABSOLUTE/PATH/TO/PROJECT/DIRECTORY/mcp-ade-server/",
                "run",
                "mcp_ade_server.py"
            ]
        }
    }
}
Example: Windows
{
    "mcpServers": {
        "ade-server": {
            "command": "C:\\Users\\YourUser\\AppData\\Local\\Programs\\uv\\uv.exe",
            "args": [
                "--directory",
                "C:\\Users\\YourUser\\Documents\\Projects\\mcp-ade-server",
                "run",
                "mcp_ade_server.py"
            ]
        }
    }
}
6. Finally, Let’s Test It Out
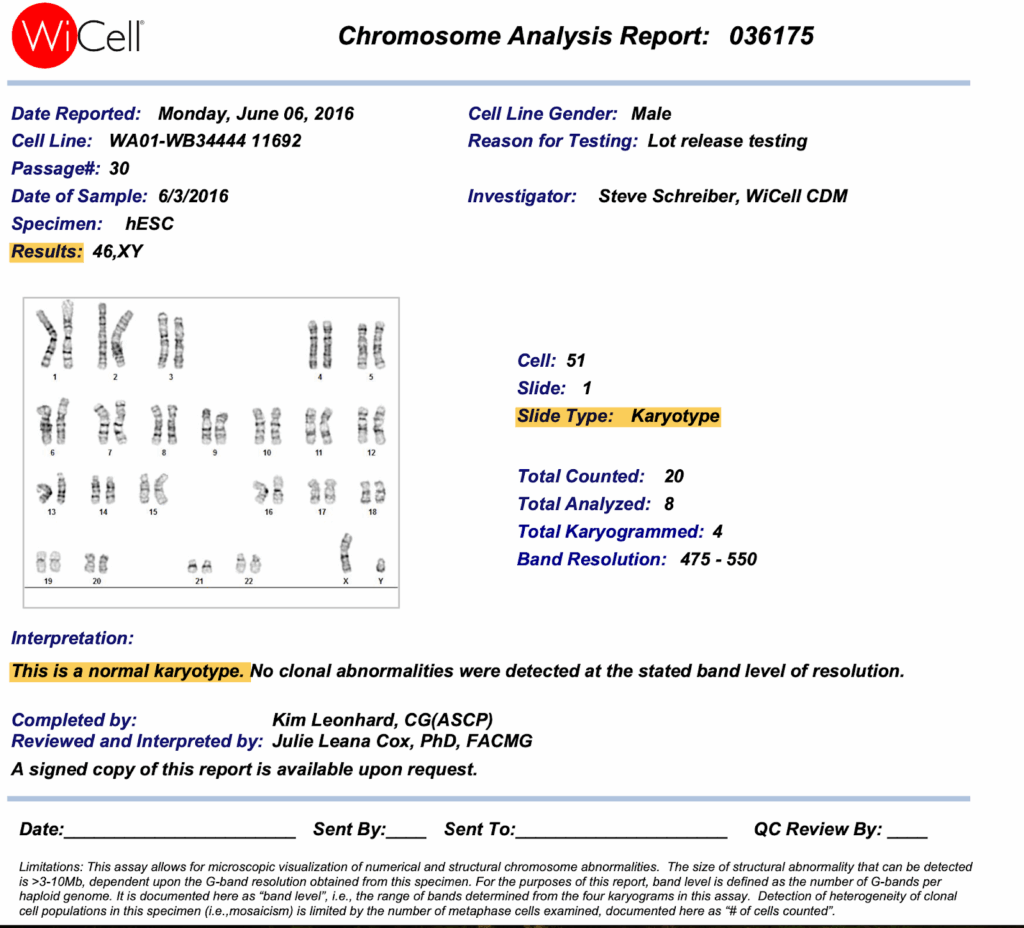
Once everything is configured, you can start a conversation with Claude and ask it to use your new tools. We’ve already seen an example with a financial statement in the beginning but now let’s test our MCP server using a more complicated 5-page real-world lab report.
The Document:
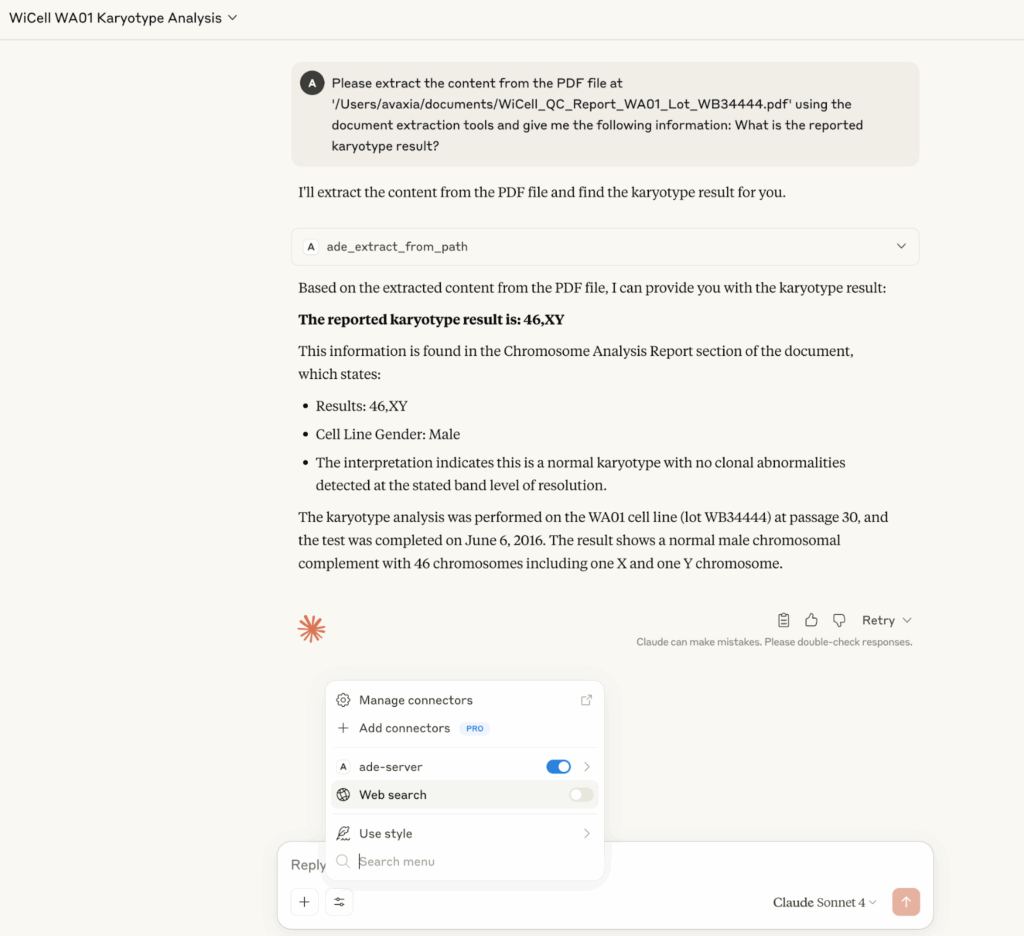
The Interaction:
You can now ask Claude to analyze this local file. Claude will automatically select the best tool for the job—in this case, ade_extract_from_path—and get to work.
As you can see, Claude correctly calls the tool, processes the document, and extracts the specific information requested.
7. Conclusion and Key Takeaways
Congratulations! You just built your own MCP server for advanced document understanding. This is a step towards building true AI Agents.Here are the key takeaways:
MCP is a Gateway: MCP servers act as a uniform, stable and reliable gateway to interact with AI models and other APIs.
Always Start with the Docs: Understanding the API you’re working with is the first and most important step to success.
Boilerplates Accelerate Development: Don’t reinvent the wheel. Use a solid template to handle the repetitive parts of server setup.
Agentic Document Extraction is Flexible: With support for both Pydantic and JSON Schema, you have powerful options for defining the exact data structure you need.