

I recently decided to sell some of my old stuff online—shoes, furniture, random trinkets—and quickly realized how embarrassingly messy my apartment looked in photos. Think dustbins in the corner, socks tossed around, and random hair tufts on the floor. Definitely not the photo aesthetic that screams “Buy this now!”
Instead of tidying up (who has time for that?), I thought: “There must be an AI solution!”—and down the rabbit hole I went. Thanks to ChatGPT, I discovered rembg to remove backgrounds, but that led me into repository cloning and installing obscure packages. Next, I wanted to auto-generate captions for my images, so I switched to yet another model. Each step required a different library, a different setup, and a swirl of tutorials.
As a Developer Advocate at LandingAI, a visual AI–focused company, I want to highlight VisionAgent. It promises a unified interface for tasks like object detection, segmentation, captioning, and more—without requiring you to train or fully understand each individual model’s internals. Rather than taking my word for it, follow this tutorial and discover how a single, cohesive platform can transform your workflow.
In just four hours, I built a user-friendly application that removed the messy backgrounds from my photos, brightened and sharpened my products, suggested more appealing backgrounds (no more socks on the floor!), and generated snappy, eBay-worthy captions. In this blog post, I’ll show you exactly how I did it—and how you can, too.
💡 Full source code is available in a linked repository at the end of this post, which you can clone and run locally.
1. The Challenge: Turning Messy Photos into Perfect Listings
If you’ve ever tried to sell something online—shoes, furniture, or anything else—you know the importance of a clean, attractive photo. But achieving it can be tough:
- Clutter: Unwanted items or household objects in the shot.
- Poor Lighting: Dimly lit spaces that do your product no favors.
- No Time: I’d rather procrastinate than clean and set up a well-lit scene.
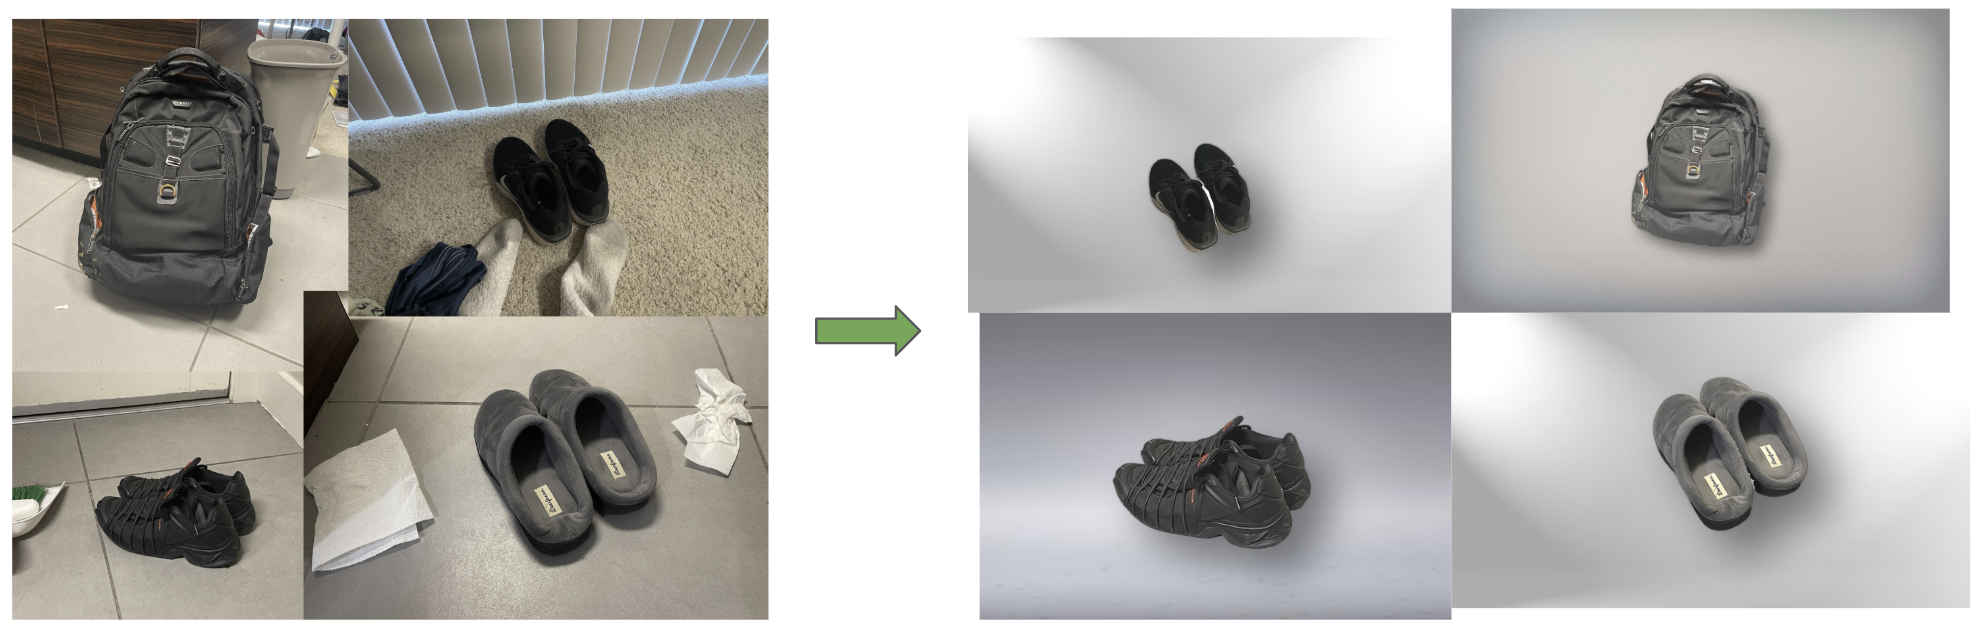
What if, in a single click, you could have your product neatly extracted from any busy background, placed against a clean or stylish new background, and given a crisp, well-lit finish?
2. Enter VisionAgent
VisionAgent is a generative Visual AI application builder. It follows an “agentic” framework to handle complex visual tasks requiring reasoning. It modularizes tool selection to pick the best visual tool for a task and leverages built-in design patterns to solve particularly complex visual problems.
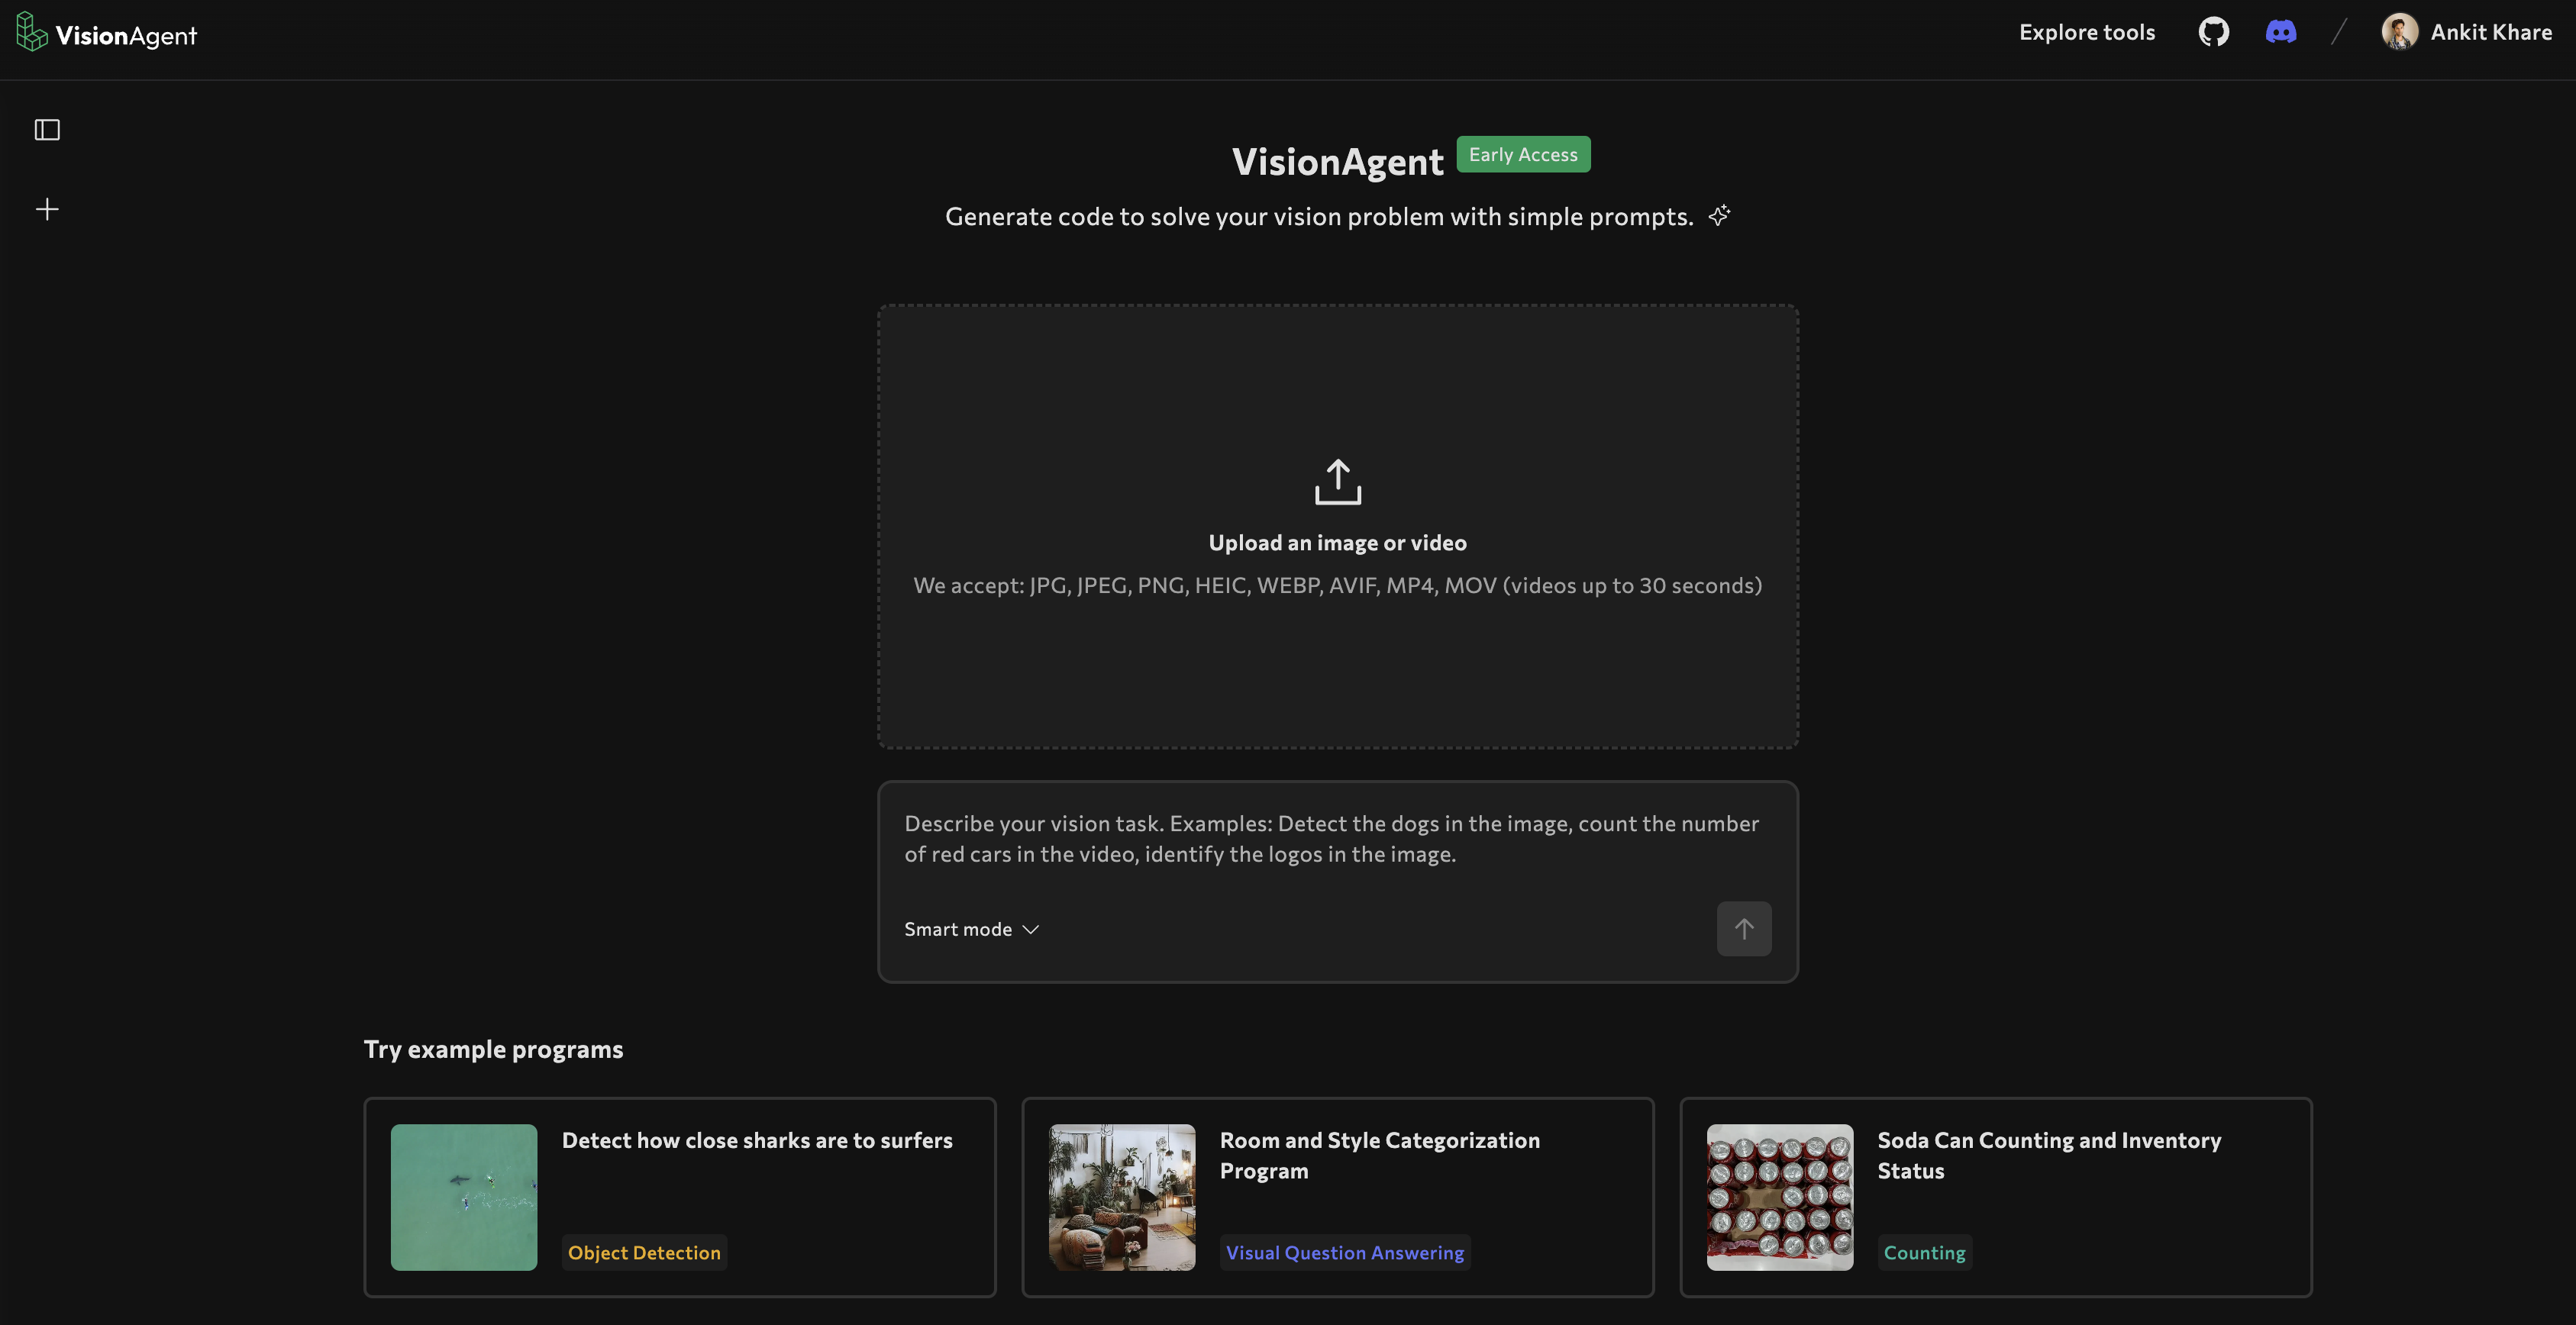
Sounds heavy? Worry not! Think of it as an AI Agent that streamlines application building by providing access to state-of-the-art vision models under a single interface, plus ready-to-consume code snippets to stitch into your app.
For our current app, we specifically used VisionAgent to wrap tasks such as:
- Object Detection
- Instance or Semantic Segmentation
- Image Captioning
- Image Processing and Enhancement
…in easy-to-use functions like:
detections = florence2_object_detection("detect the one major object", image_data)
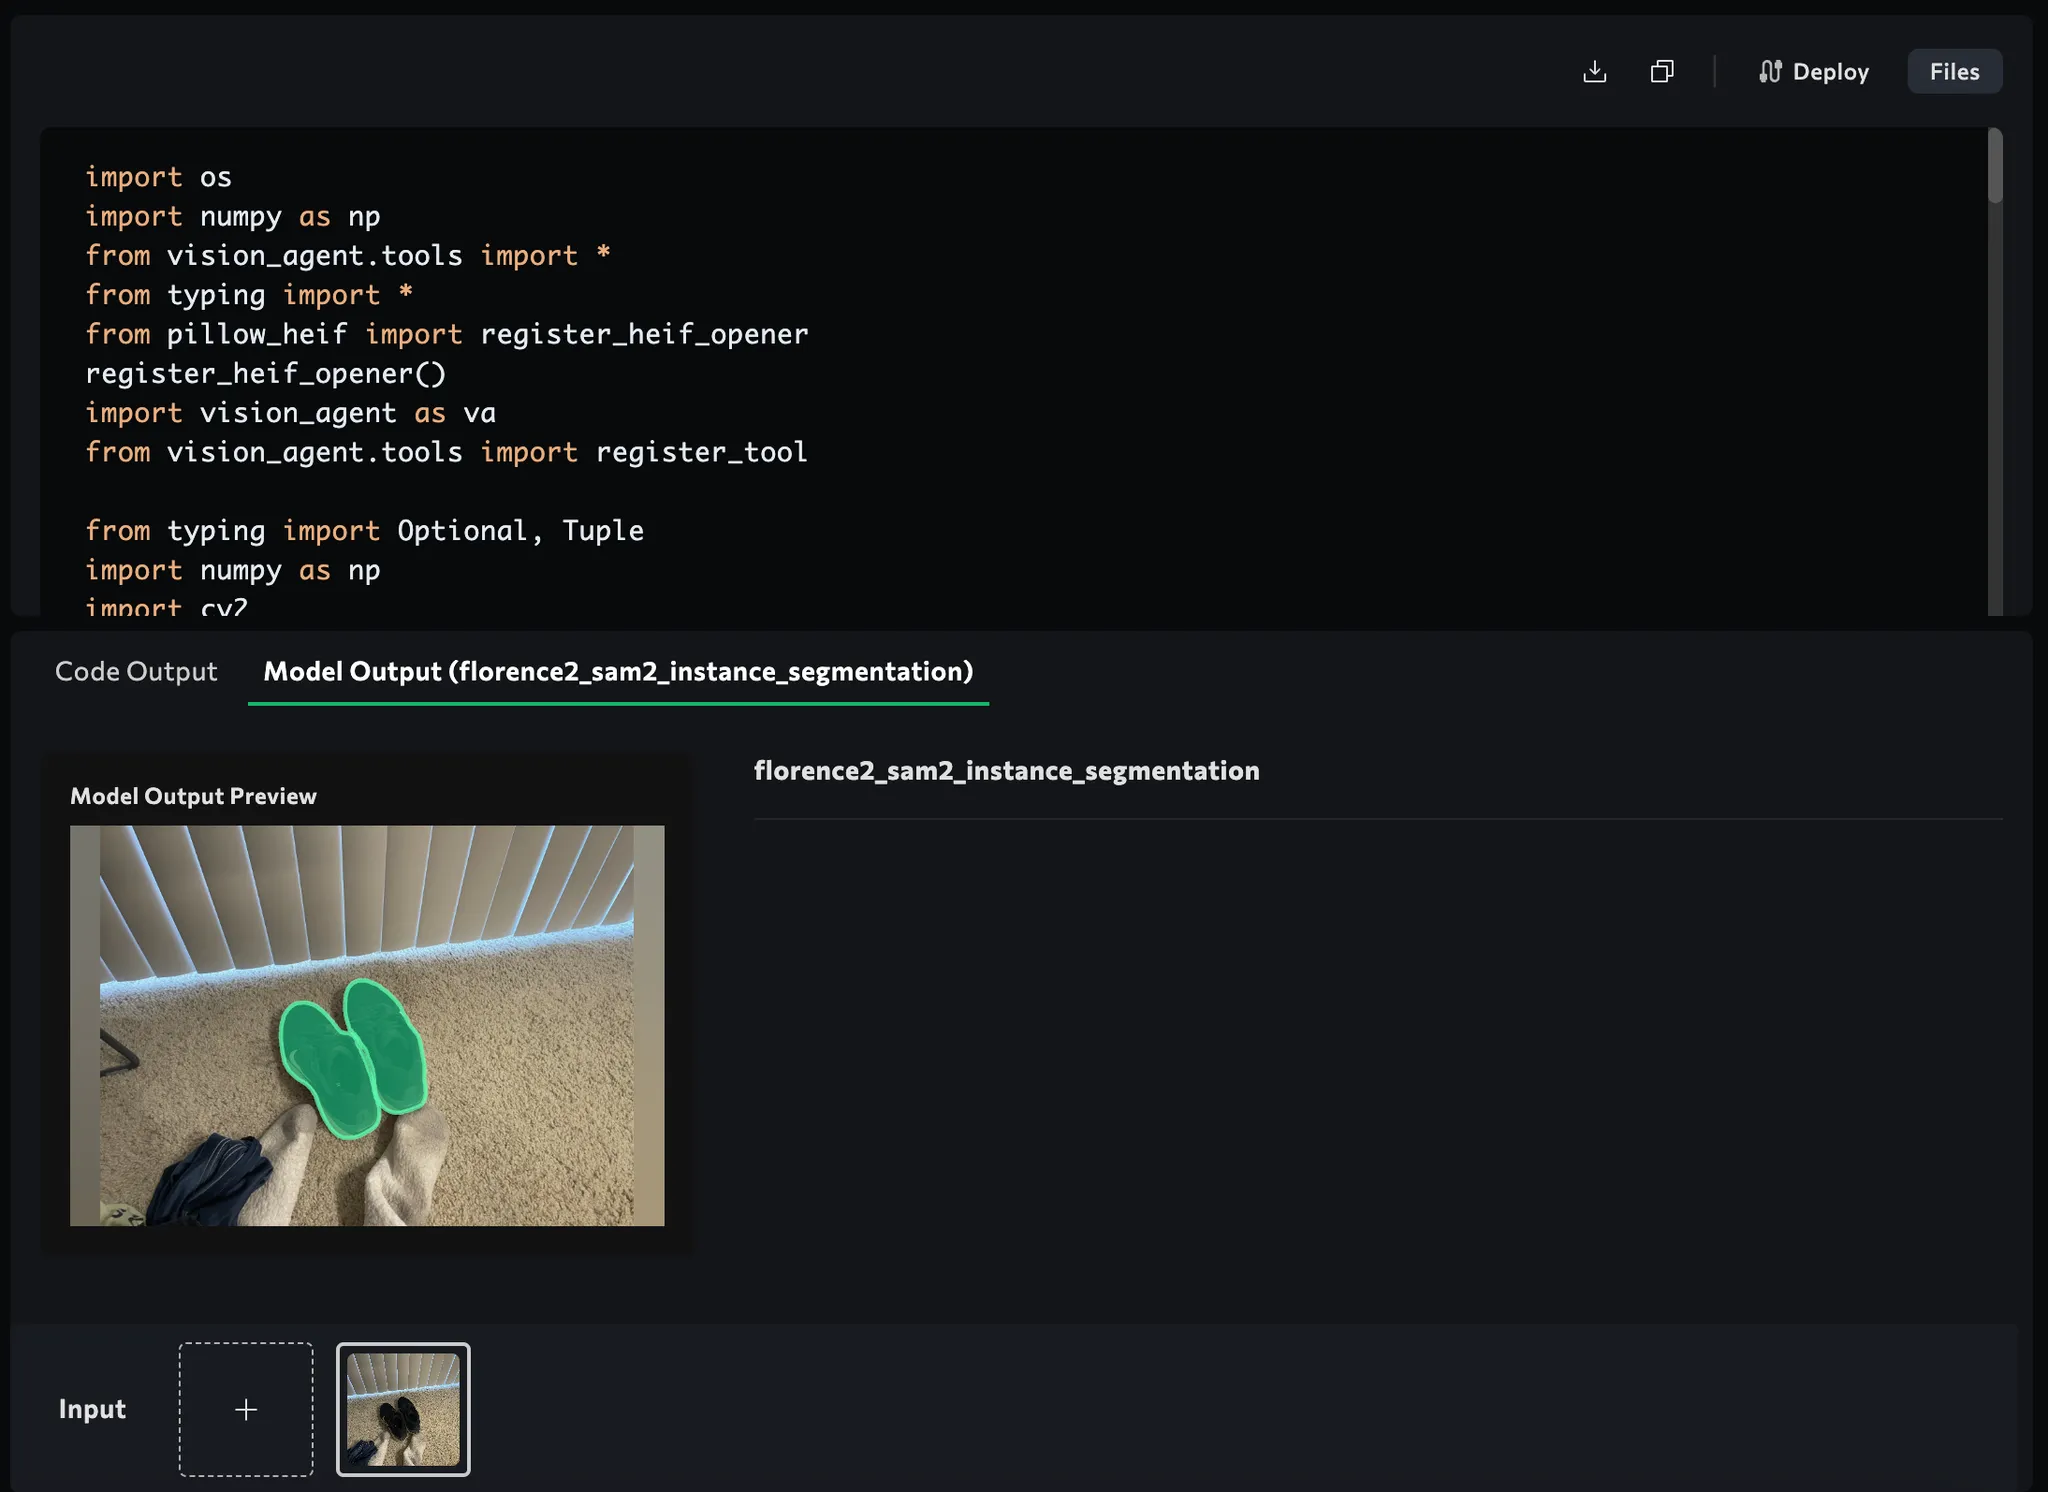
segmented_image = florence2_sam2_instance_segmentation("Segment the main object", image_data)
caption = qwen2_vl_images_vqa("Describe this product...", [image_data])
enhanced_image = auto_enhance_image_simple(image_data)
sharpened_image = unsharp_mask(enhanced_image)
No more rummaging around multiple repos, loading model checkpoints, or tinkering with Torch/TensorFlow code. VisionAgent abstracts all that complexity away under one roof.
3. My Journey Building This App with VisionAgent
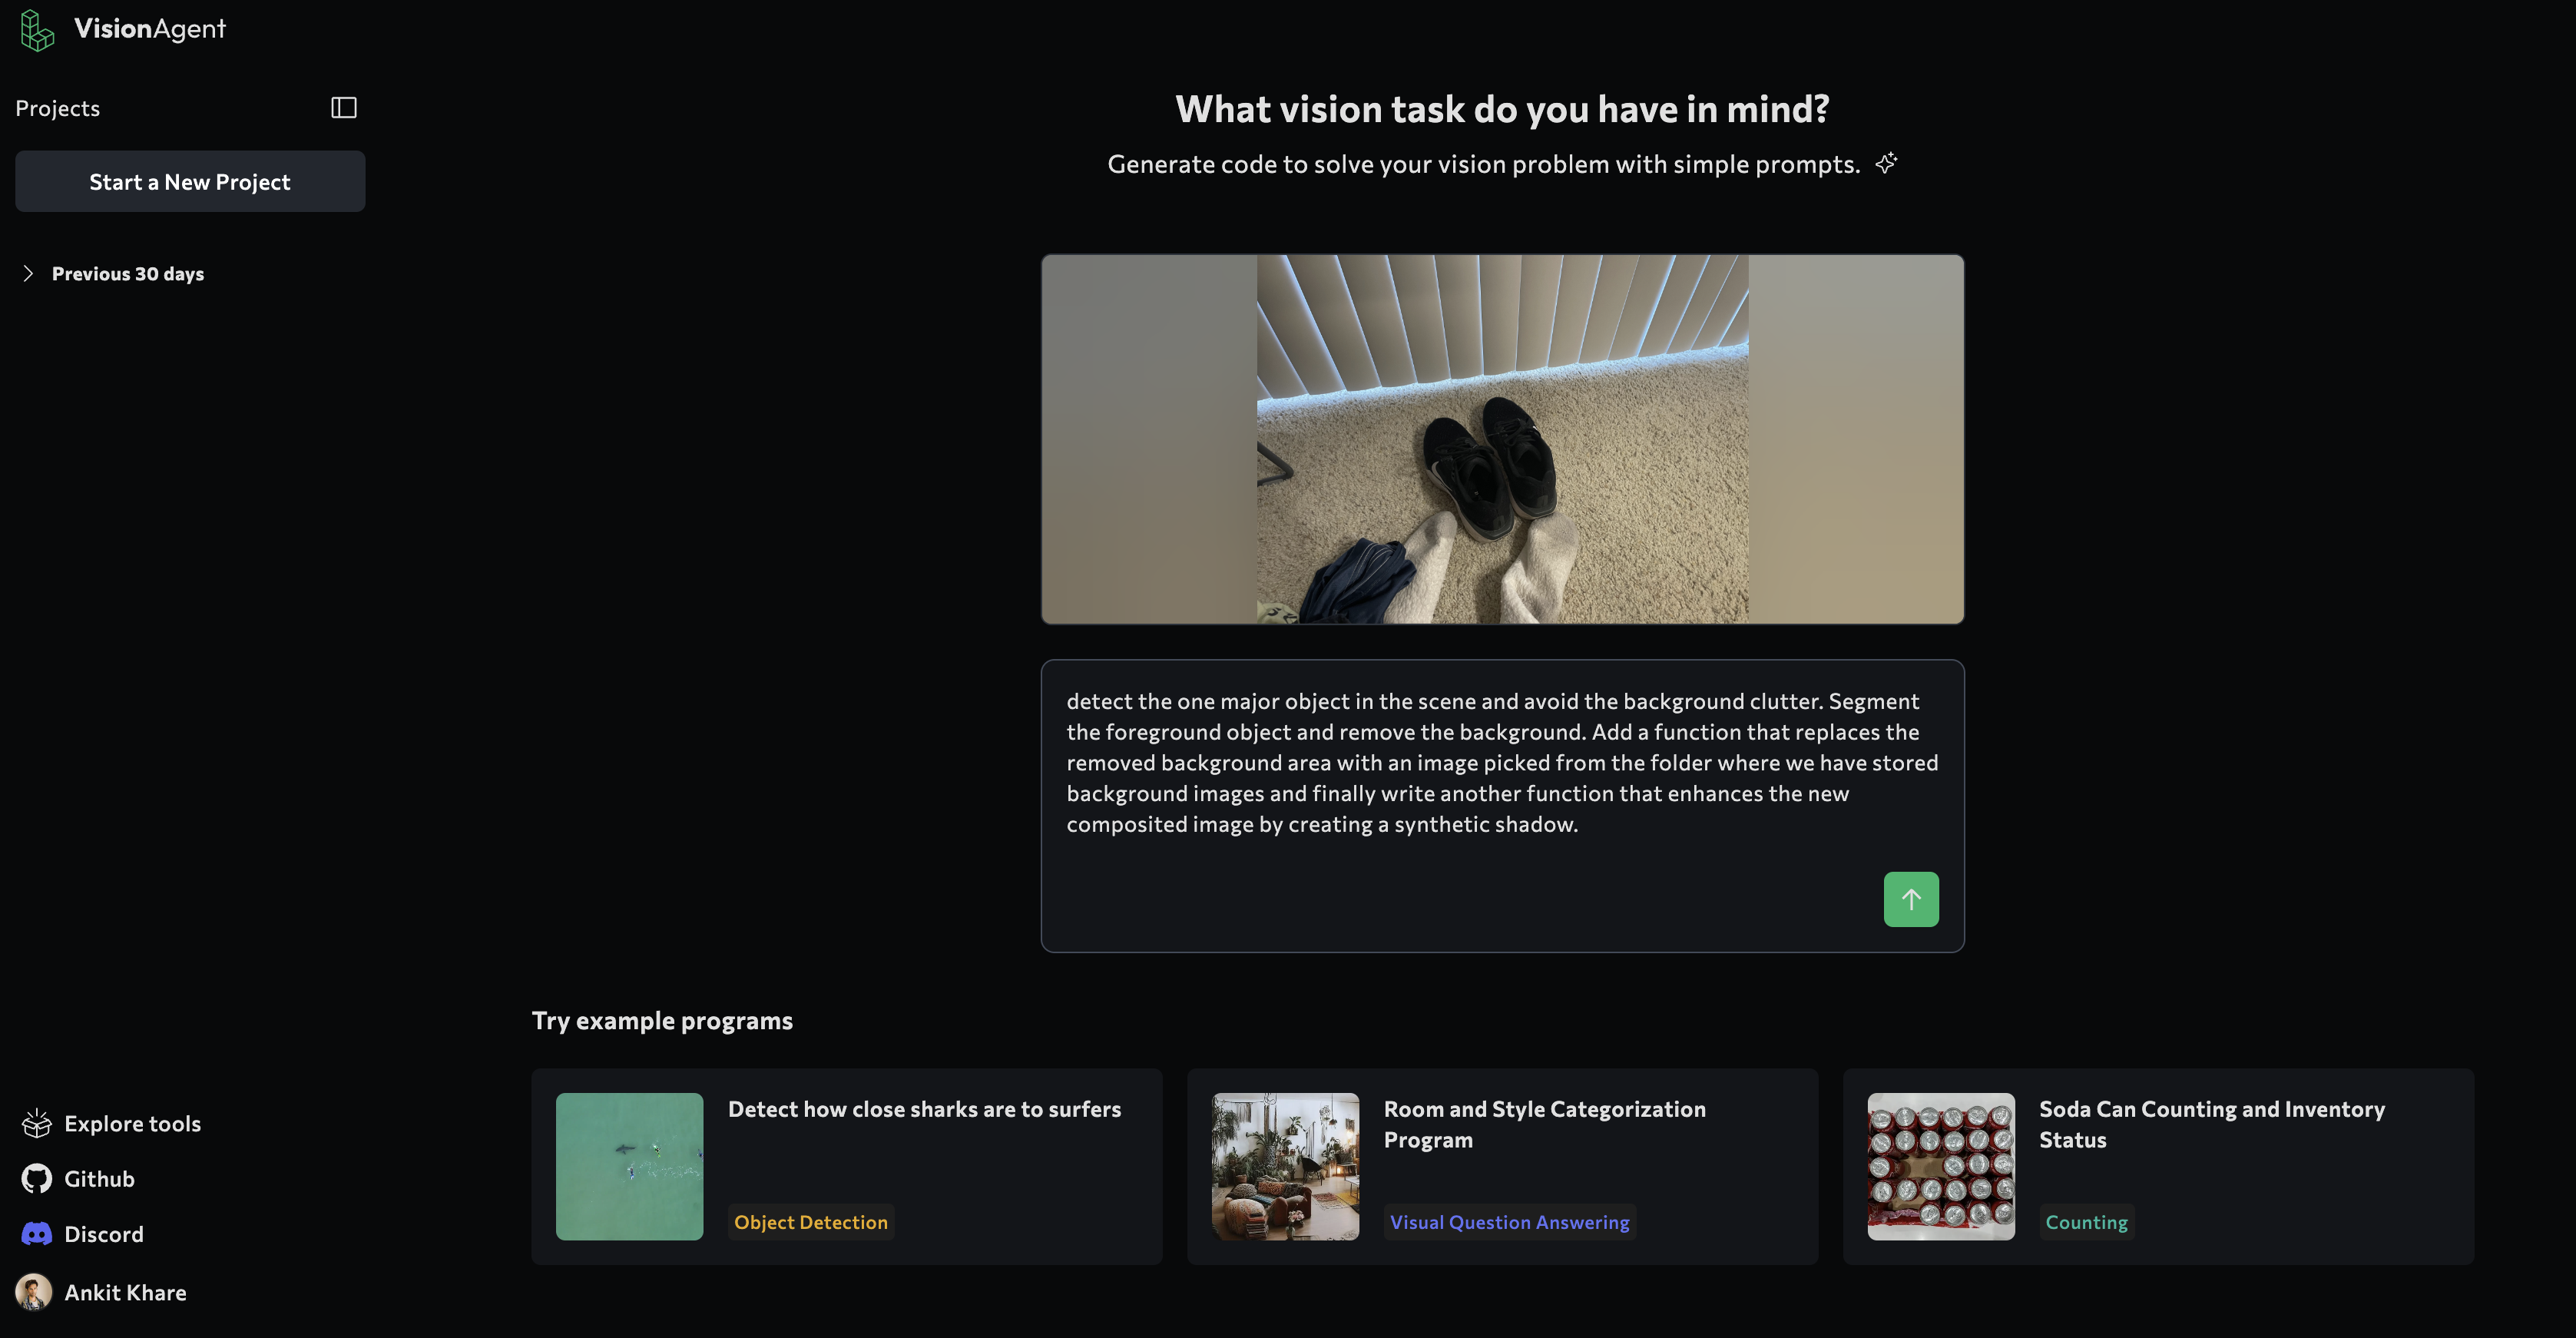
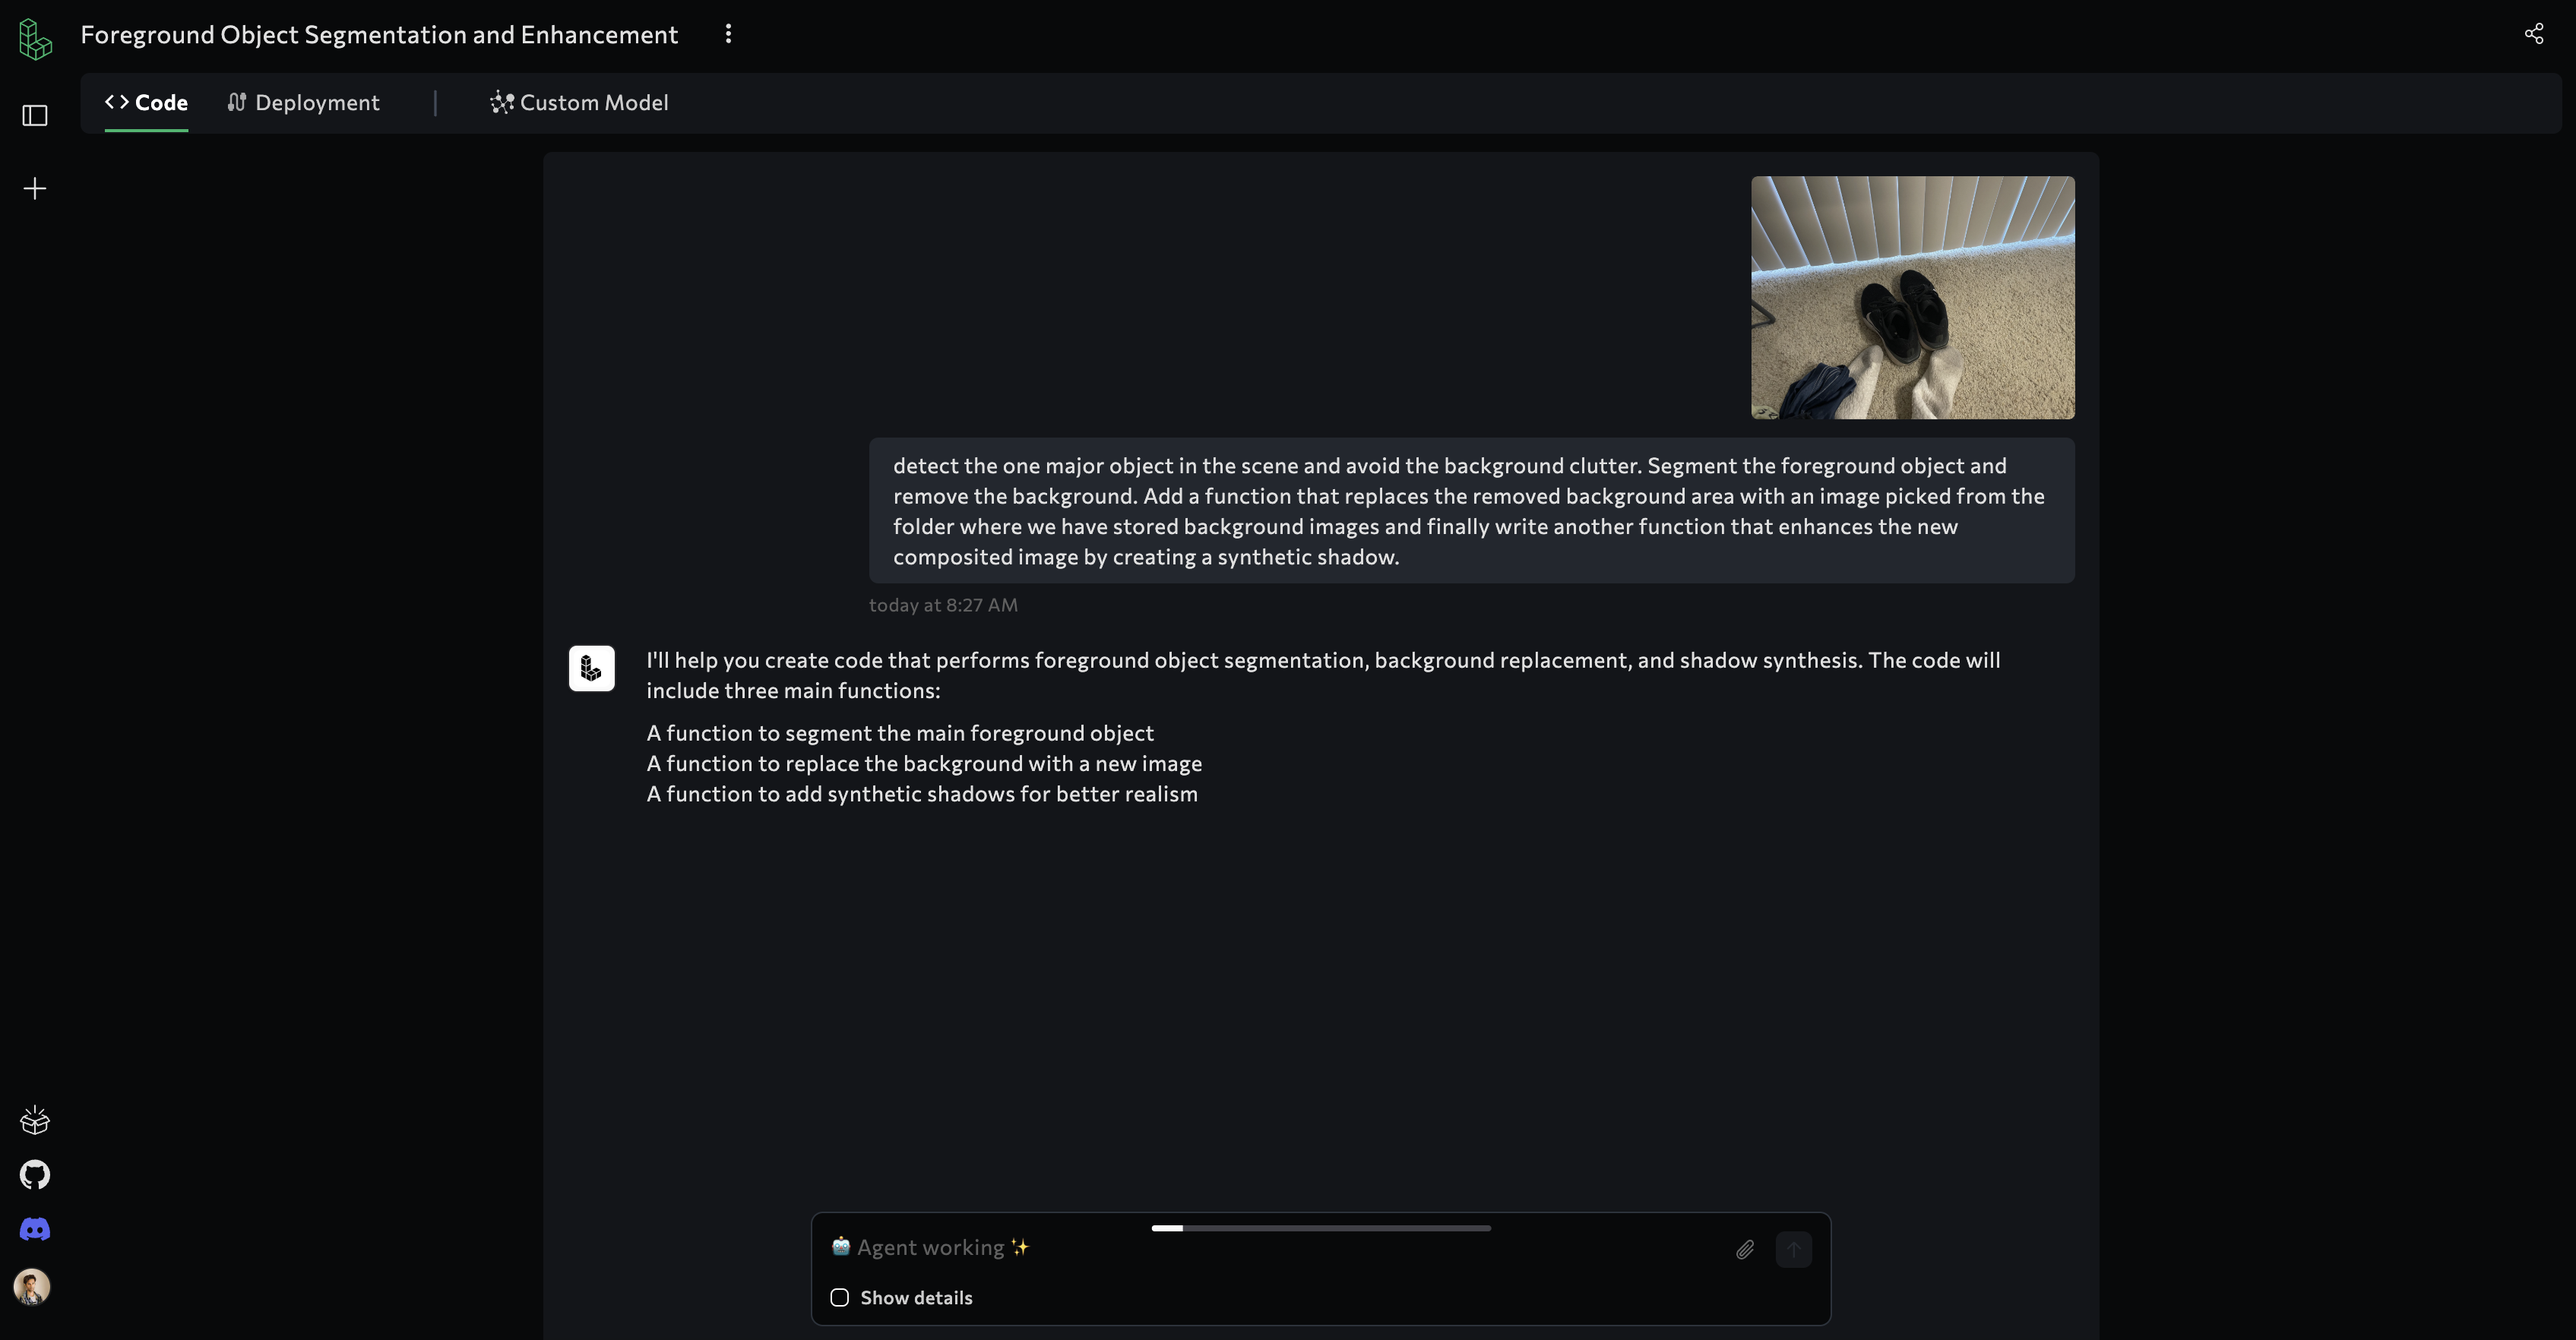
My path to building this application wasn’t a straight line. I initially asked VisionAgent:
“detect the one major object in the scene and avoid the background clutter. Segment the foreground object and remove the background. Add a function that replaces the removed background area with an image picked from the folder where we have stored background images and finally write another function that enhances the new composited image by creating a synthetic shadow?”
VisionAgent gave me a solution using flux_image_inpainting for generating entirely new backgrounds based on text prompts:
    def segment_and_replace_background(image_path: str,

      background_prompt: Optional[str] = None) -> np.ndarray:

        """

        Segment the main subject (e.g., person with basketball) from the given image,

        darken the background, apply brightness/contrast enhancements, and optionally replace the background using inpainting.

        """

    # 1. Load the image

    # 2. Segment the subject using florence2_sam2_instance_segmentation

    # 3. Combine masks, darken the background

    # 4. If background_prompt is provided, call flux_image_inpainting to fill the background

    # ...

    return final_image
I even tested this approach with a sample basketball image, verifying that it could swap backgrounds. However, the open-source implemetation flux_image_inpainting model hosted by VisionAgent wasn’t producing consistently realistic or well-matched results; it needed heavy fine-tuning. So I pivoted to a curated backgrounds + LLM strategy:
- Manually gather nice background images (e.g., living room, clean white studio).
- Use Claude/Gemini/OpenAI to rate each background based on a detailed caption of the product.
- Composite the foreground object with the new background with a professional looking synthetic shadow effect
- Present the top 3 backgrounds to the user for final selection.
This gave me more consistent compositing. Plus, I didn’t need a generative model to “hallucinate” a new scene; I had direct control over the library of backgrounds and how they might match my product.
Finally, I just stitched each component (detection, segmentation, enhancement, and LLM-based background selection) into my Streamlit app. The result was a fast, robust product-photo enhancer that now forms the basis of my new eBay listings. That’s my complete journey—hope it helps you build and adapt your own Visual AI solutions!
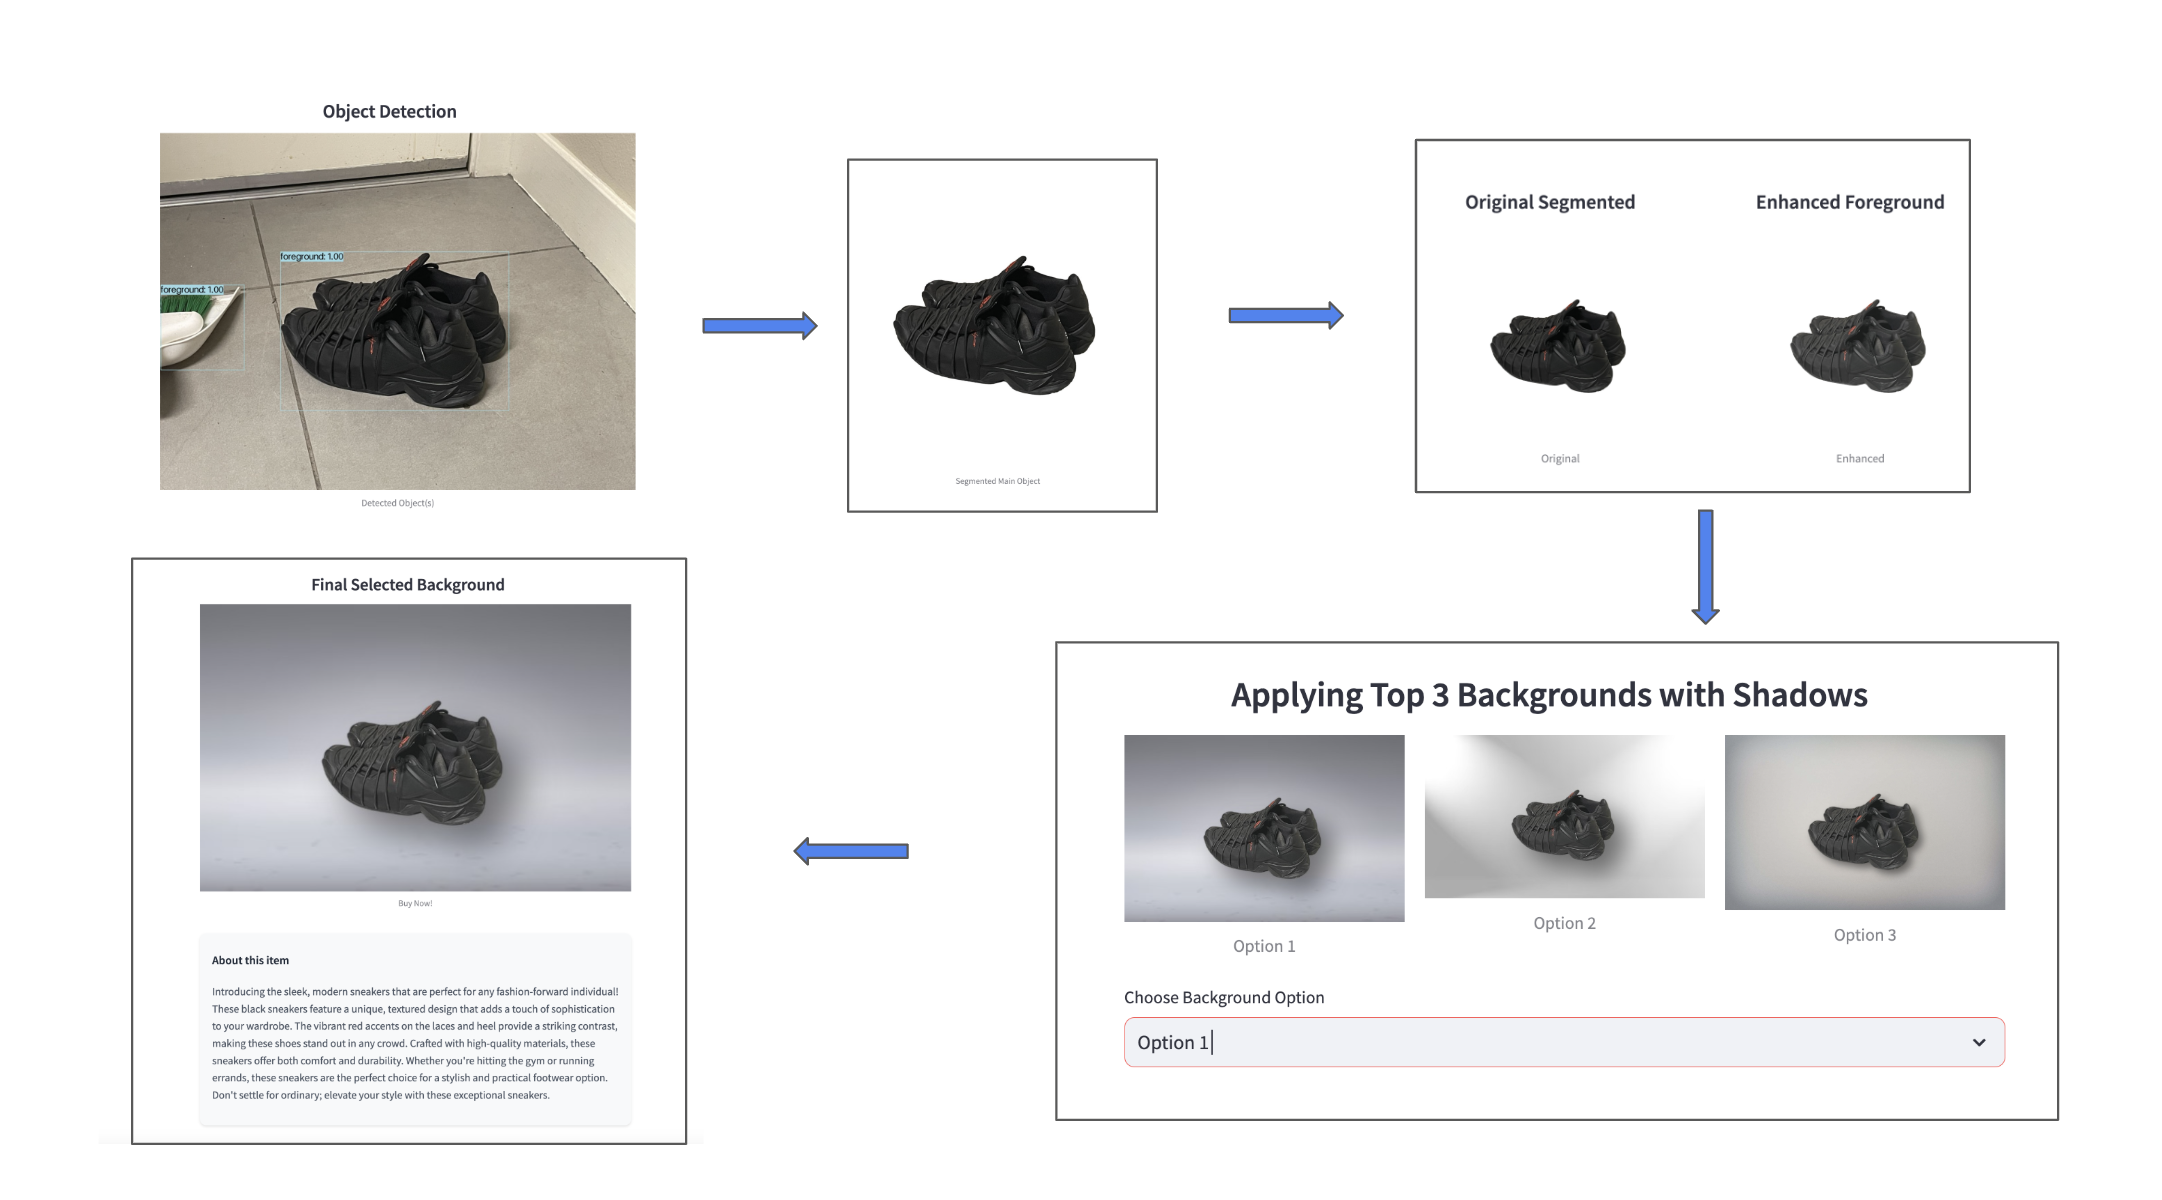
4. High-Level Flow
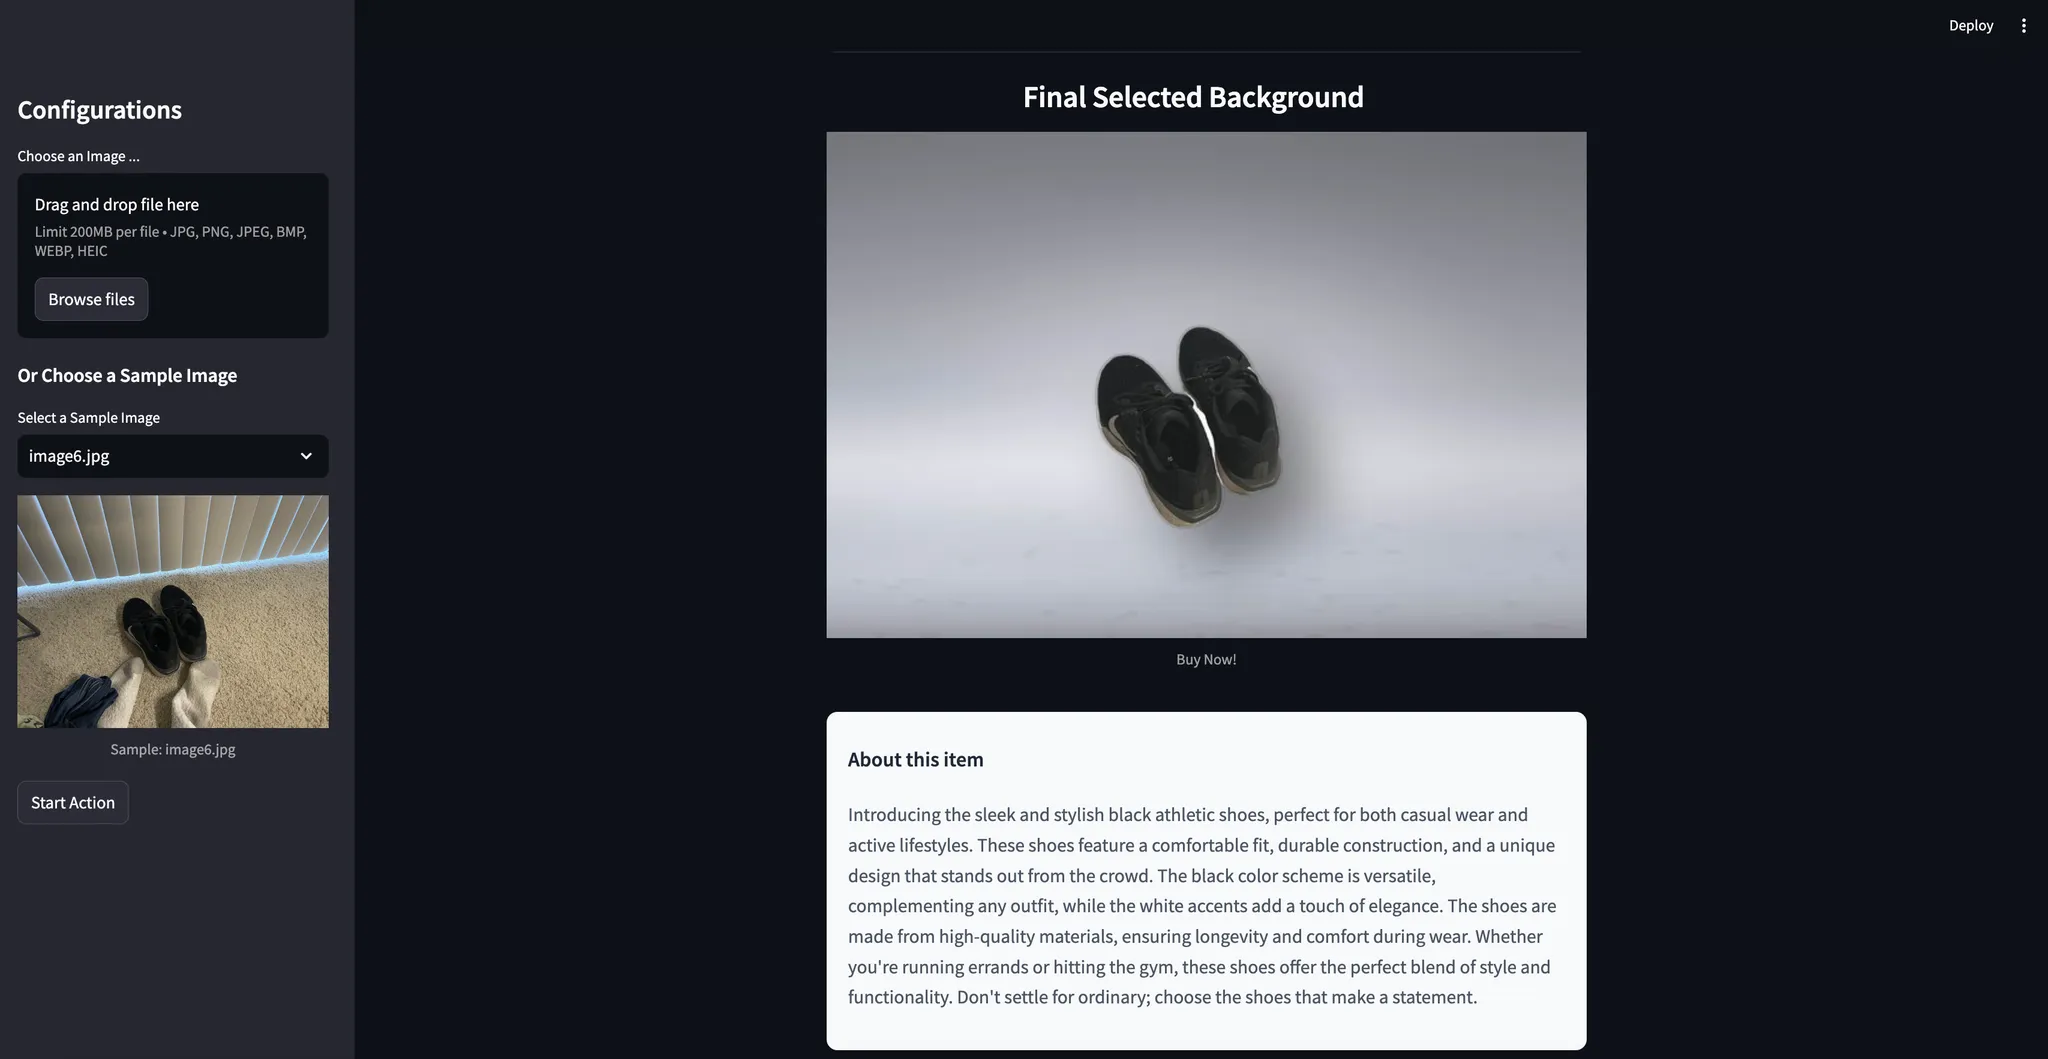
I wanted a web-based interface so my friends could also use it. Streamlit was perfect. I ended up with these main steps:
- Upload (or select from a sample) an image of the item.
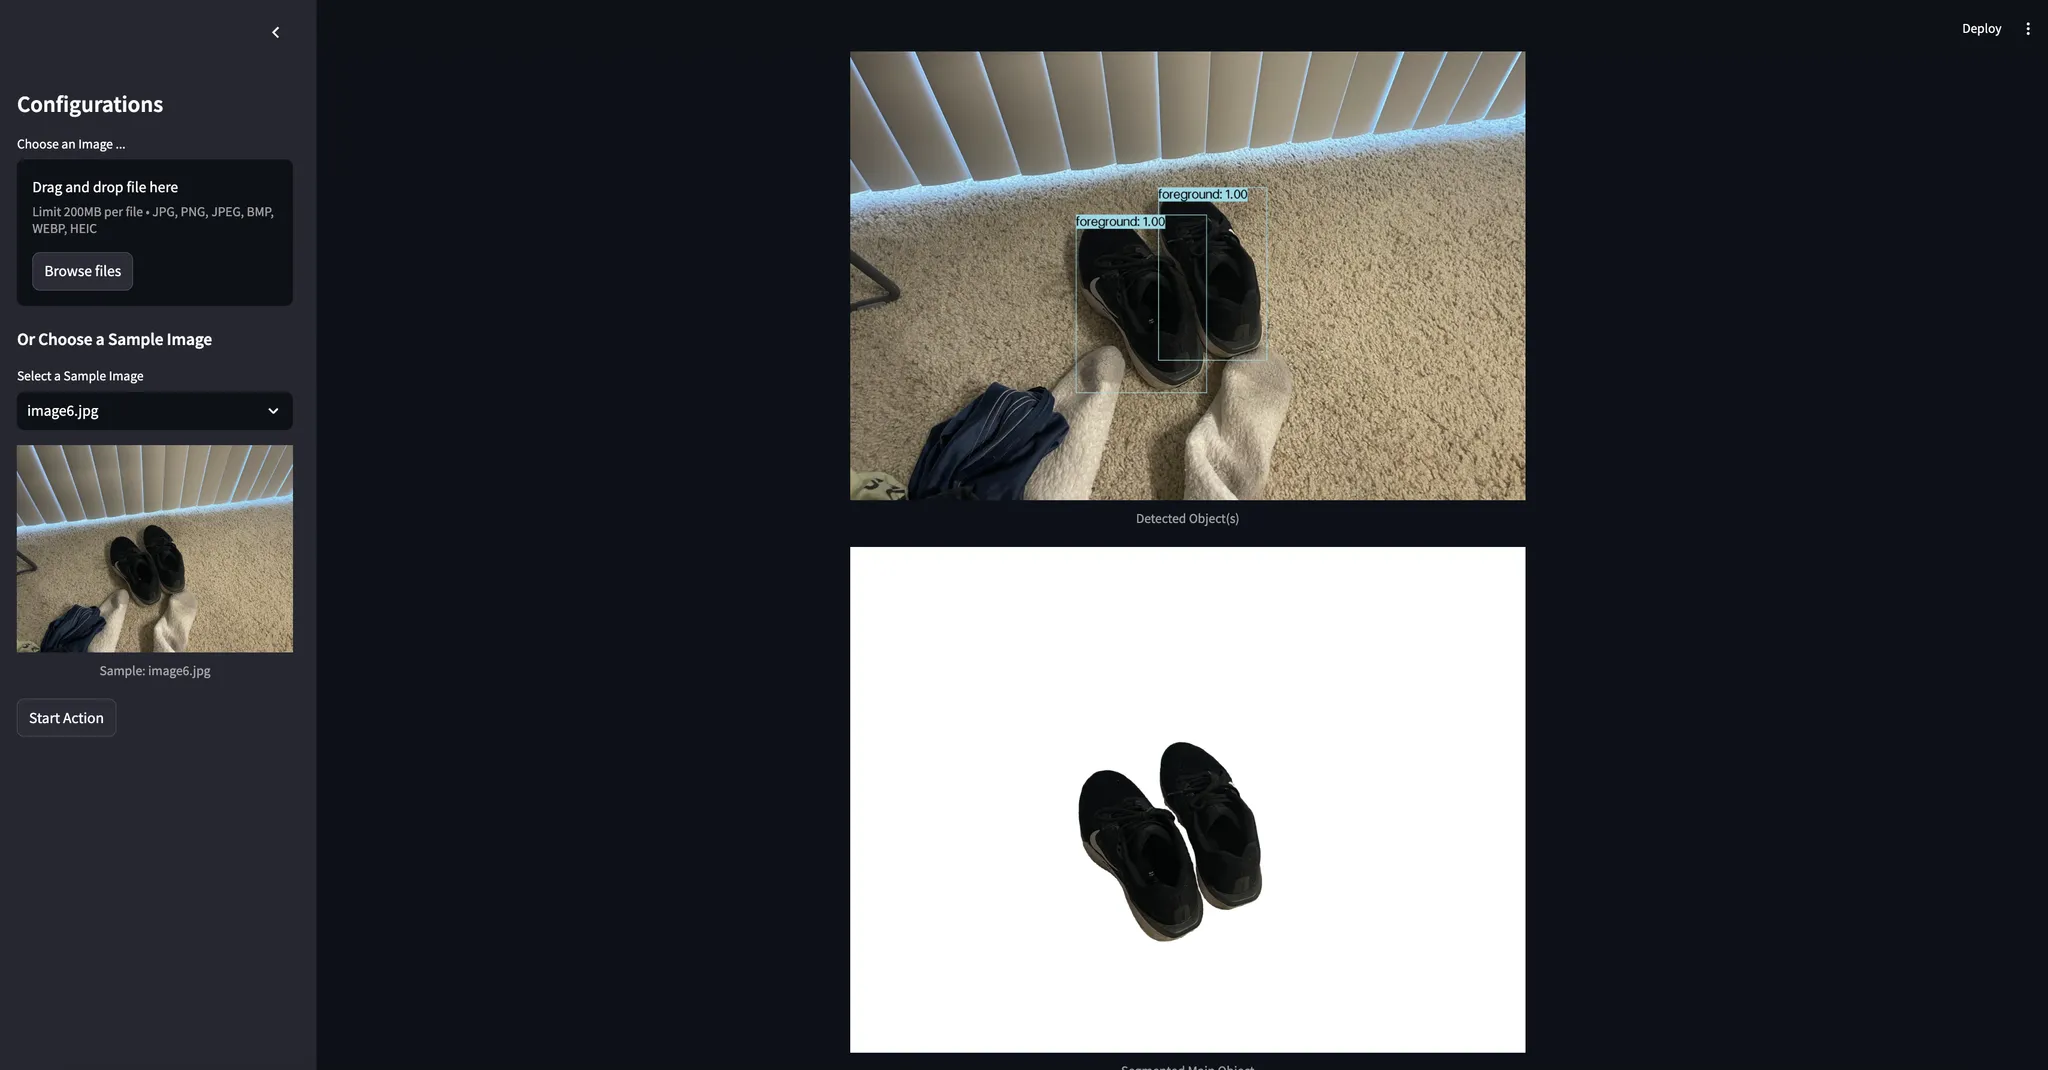
- Detect the main product using a large vision model (Florence2).
- Generate a couple of captions—one detailed (for Claude/Gemini to utilize for selecting the top 3 cool backgrounds) and one marketing-friendly (for your eBay listing).
- Segment just the product using the “Segment Anything Model” (SAM2).
- Clean up & Enhance the extracted foreground (brightness, contrast, etc.).
- Select a new background by letting an LLM rate a directory of images and pick the top matches (goodbye messy apartment!).
- Composite your product onto the best backgrounds.
- Present the results: user picks which background they like best, final marketing tagline is displayed—done.
In four hours, I had it all functioning. Most of my time went into prompt engineering (telling Claude how to select backgrounds) and setting up Streamlit’s state management for user selection. If it weren’t for these bits of housekeeping, I probably could have finished in two hours!
5. Building the Core Features
Below are some key code snippets from the files app.py and vision_tools.py. We’ve omitted some details with ... for brevity. Check the full repository for the complete code. The app.py file has the streamlit configuration & basic setup while vision_tools.py contains all the computer vision utility functions including object detection, segmentation, background removal, enhancement, and composition with shadows.
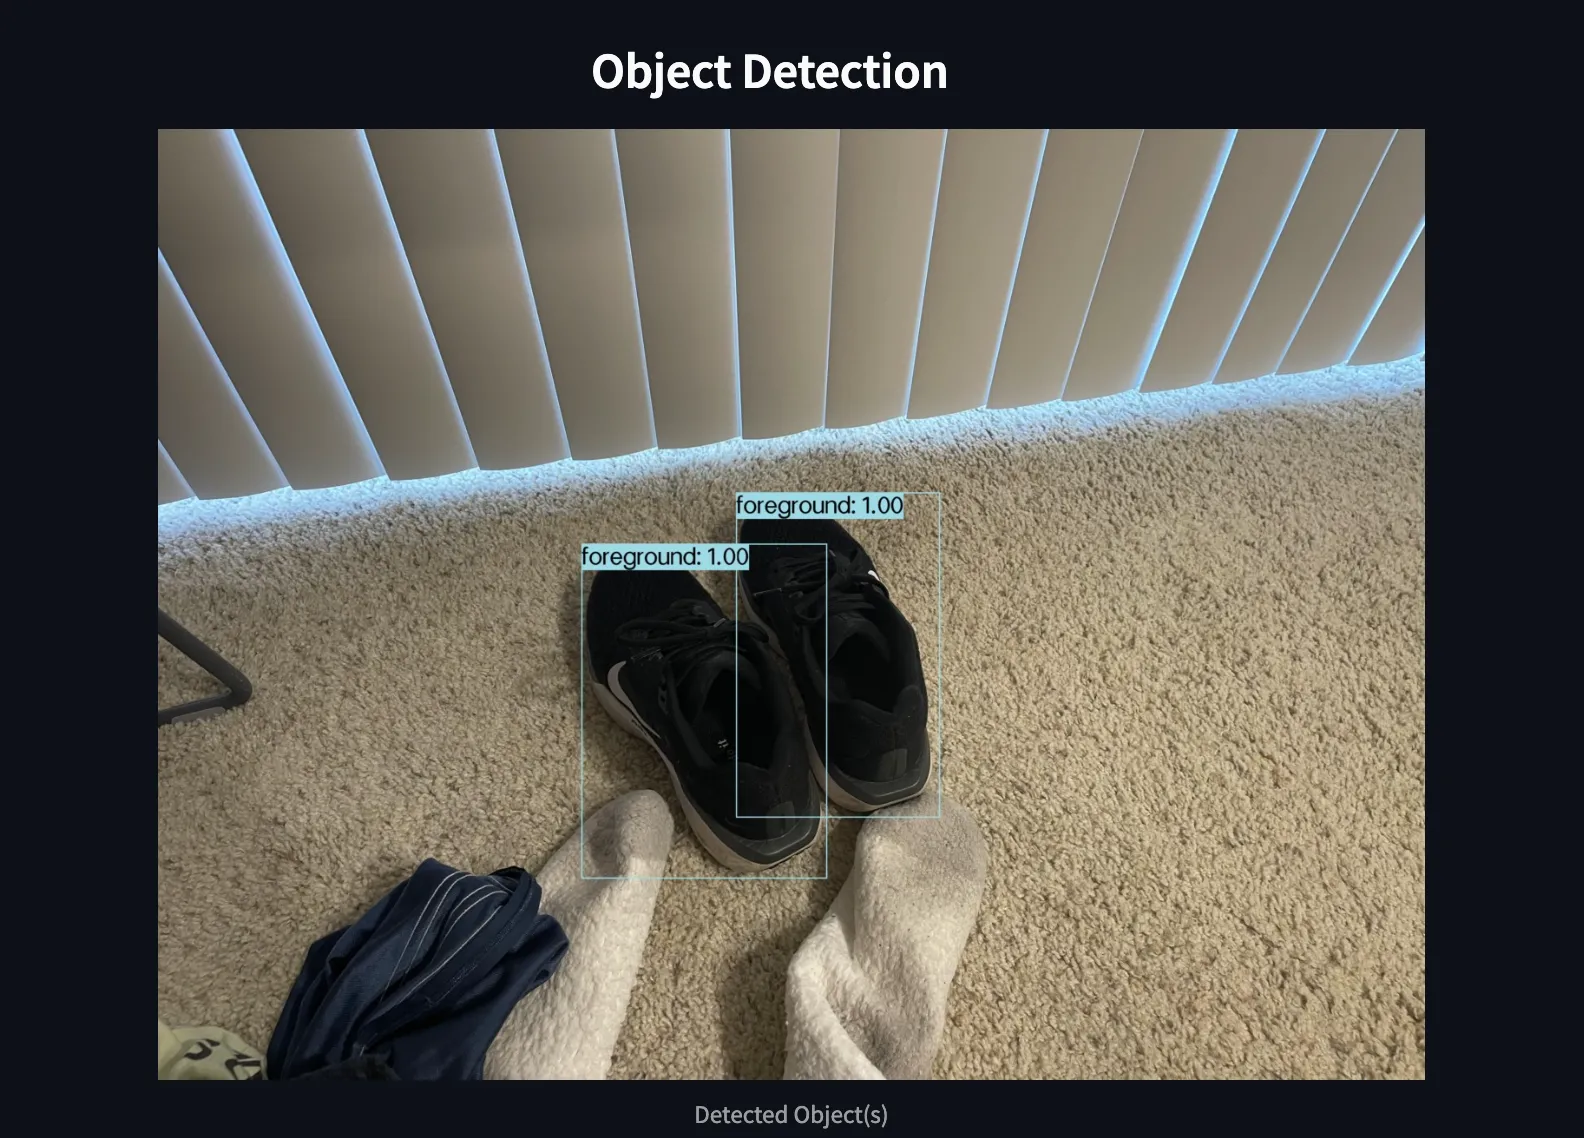
5.1 Object Detection & Captioning
A messy photo with random items might confuse a typical background removal tool. That’s why we first explicitly detect the primary object we care about (the item we want to sell), and generate captions for background selection and marketing.
vision_tools.py:
    def detect_objects(image_path):

      # 1. Load the image

      image = load_image(image_path)


      # 2. Detect the main object

      detections = florence2_object_detection("detect the one major object in the scene", image)


      # 3. Annotate the bounding boxes

      image_with_boxes = overlay_bounding_boxes(image, detections)


      # 4. Generate two descriptions (detailed + marketing style)

      claude_prompt = "Describe this product in detail..."

      claude_caption = qwen2_vl_images_vqa(claude_prompt, [image])


      ad_prompt = "Create a succinct product AD..."

      ad_caption = qwen2_vl_images_vqa(ad_prompt, [image])


      # 5. Save the annotated image

      output_path = "output_image_with_boxes.jpg"

      save_image(image_with_boxes, output_path)


      return {

        "output_image_path": output_path,

        "claude_caption": claude_caption,

        "ad_caption": ad_caption

      }
VisionAgent’s florence2_object_detection and qwen2_vl_images_vqa do the heavy AI lifting here. In a few lines, you get bounding boxes and two specialized captions—one verbose and one marketing-friendly.
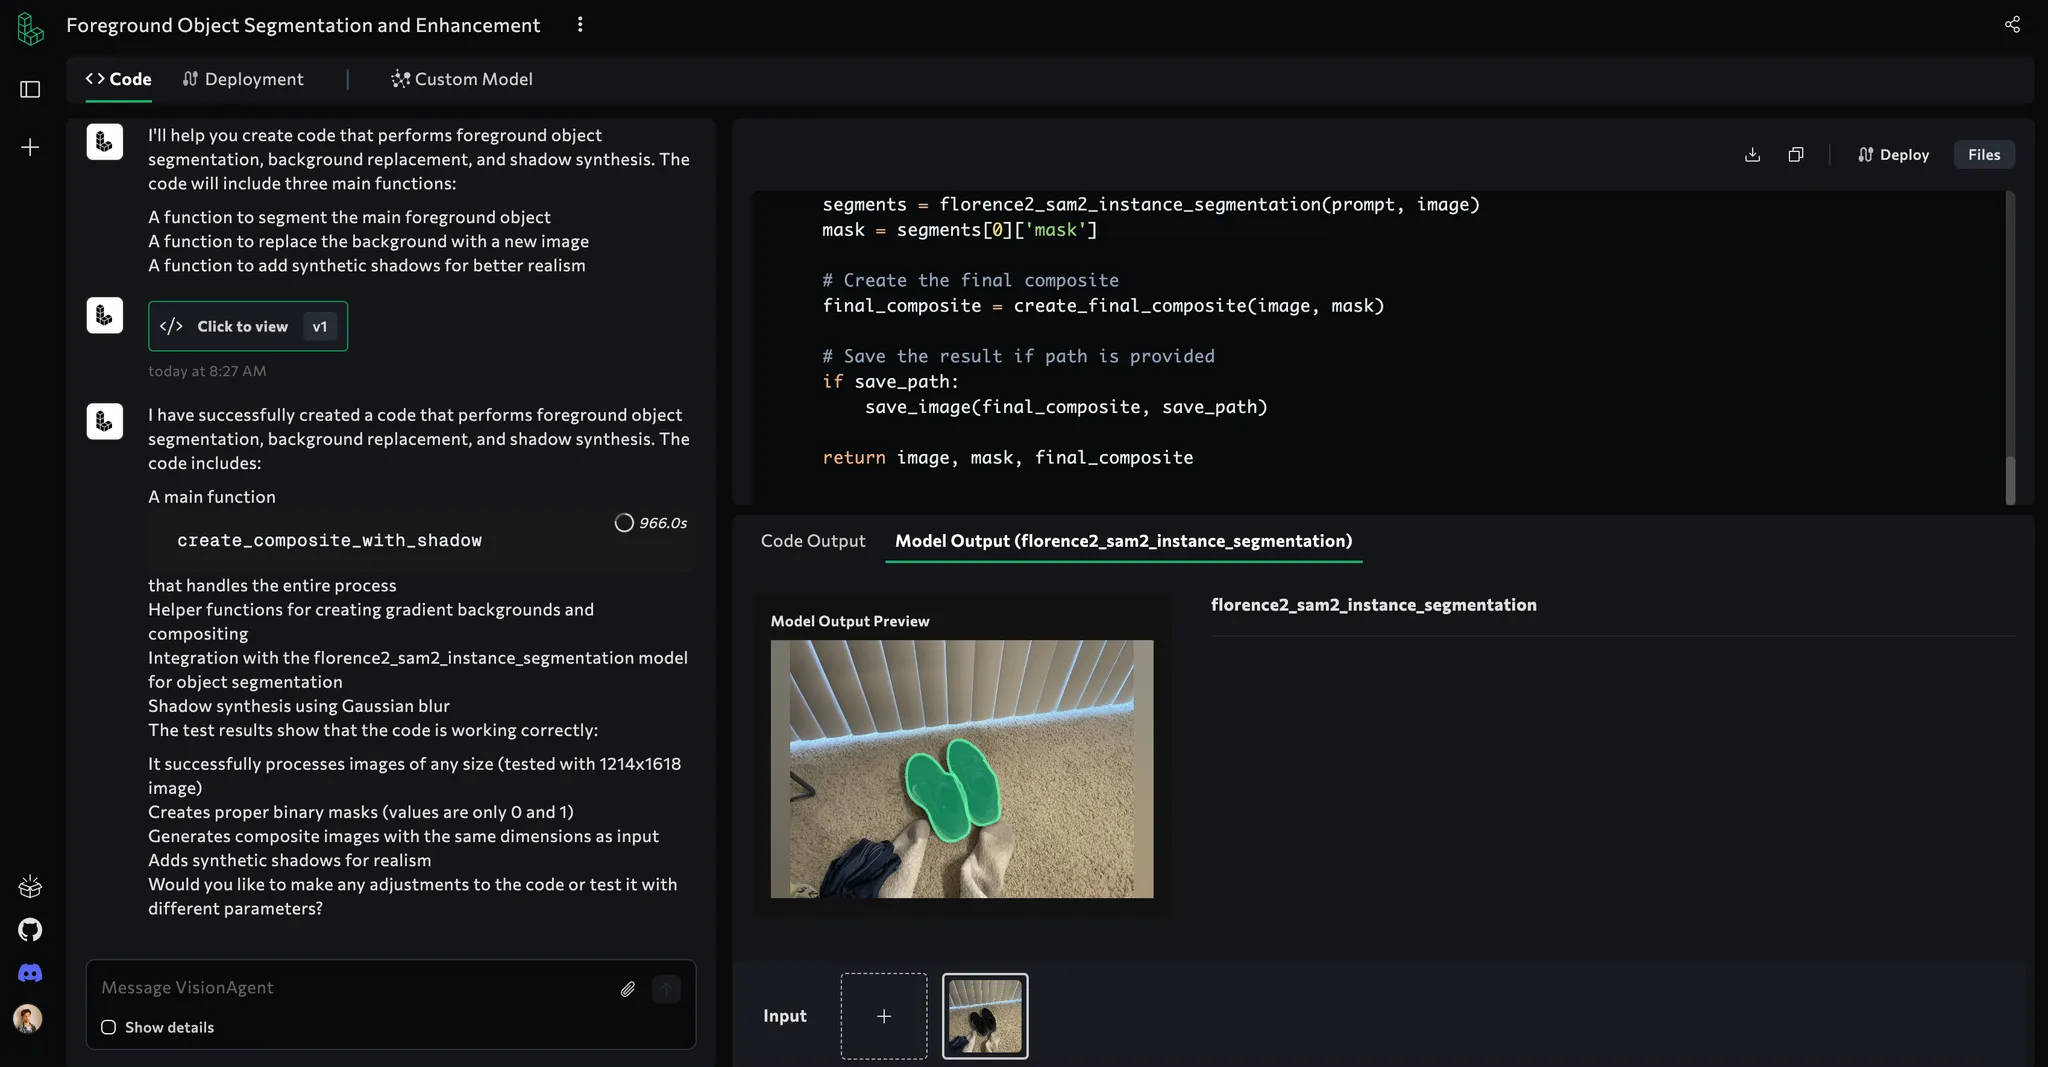
5.2 Advanced Segmentation (SAM2)
Once we know which object is our main product, we do finer instance segmentation to precisely remove the background. We rely on the “Segment Anything Model” (SAM2) from Florence2:
    def segment_and_save_objects(image_path, prompt):

      # Load the image

      image = load_image(image_path)

      segmentation_results = florence2_sam2_instance_segmentation(prompt, image)


      # Filter small objects or those at the edges

      # Combine valid masks into an image with alpha


      segmented_filename = f"{os.path.splitext(image_path)[0]}_segmented.png"

      save_image(final_image, segmented_filename)


      return segmented_filename
With SAM2, your product’s edges come out nice—no leftover bits of floor or dustbin in the corner.
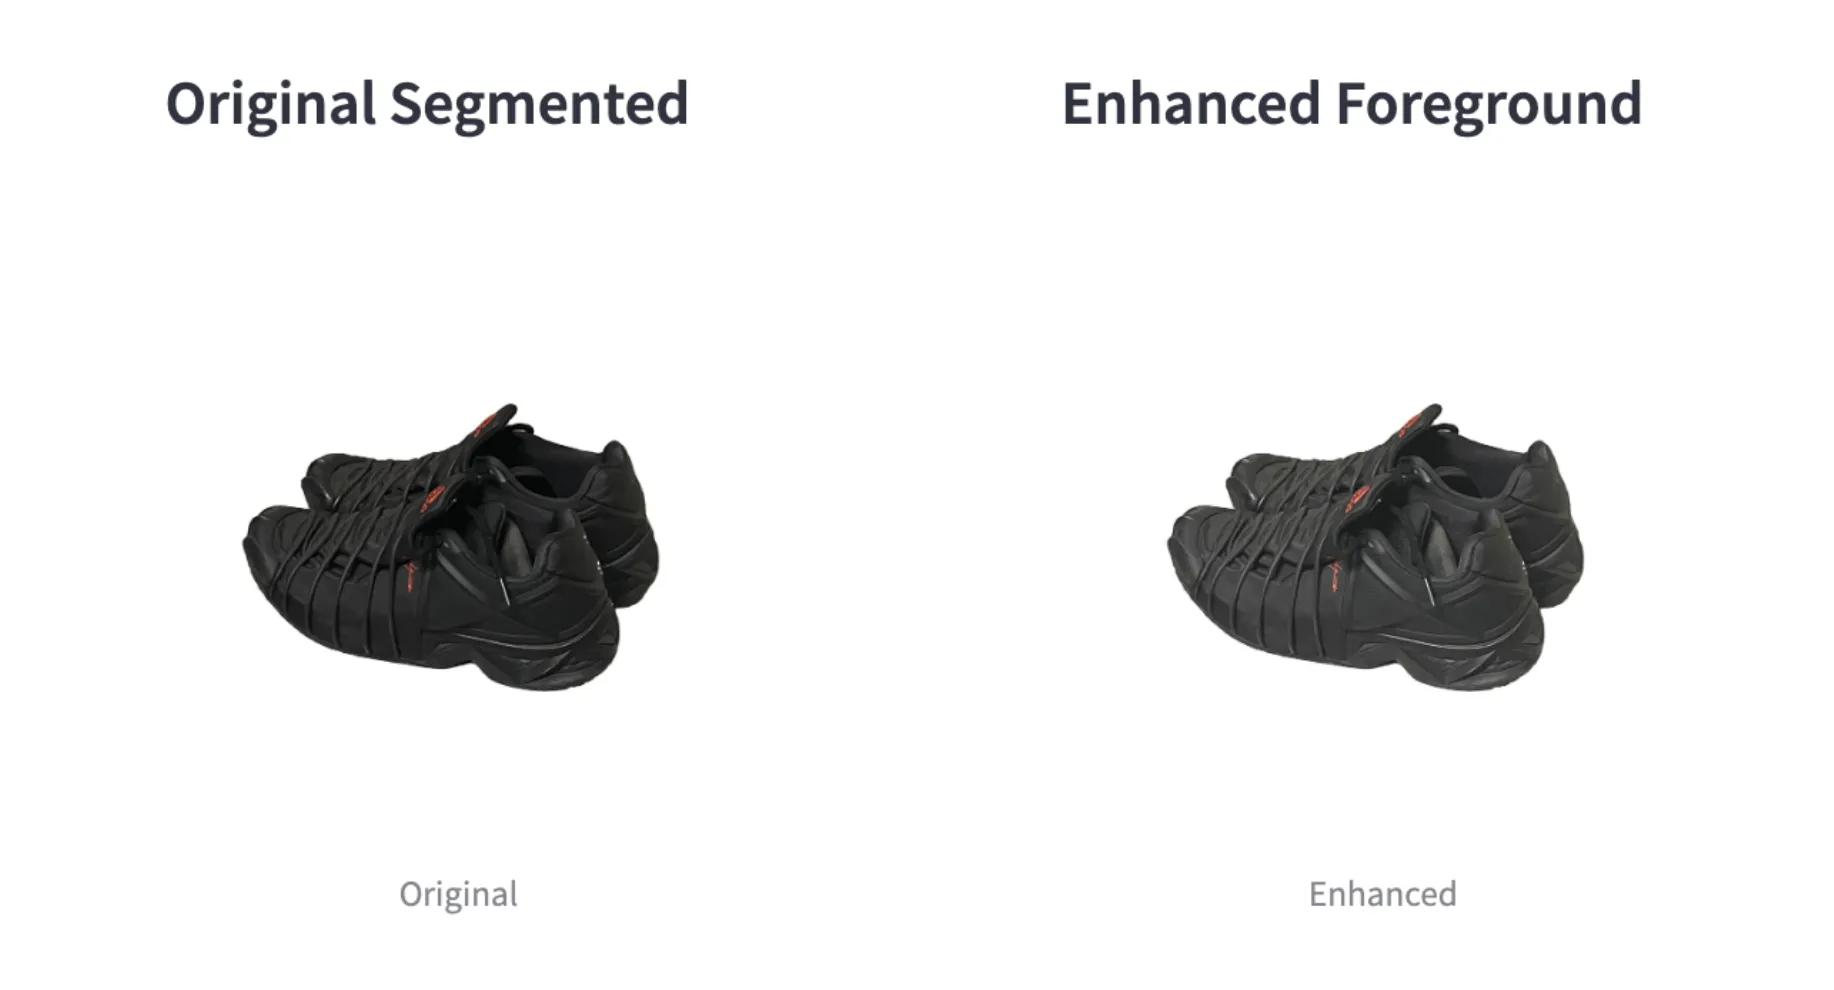
5.3 Auto-Enhancement
I realized my dimly lit shots needed a bit of a glow-up. So, we added:
    def unsharp_mask(image, sigma=1.0, strength=1.5):

      blurred = cv2.GaussianBlur(image, (0, 0), sigma)

      sharpened = cv2.addWeighted(image, 1.0 + strength, blurred, -strength, 0)

      return sharpened


    def auto_enhance_image_simple(img_bgr: np.ndarray) -> np.ndarray:

      # Applies brightness/contrast adjustments & mild unsharp mask

      # ...

      return final_img
The foreground is crisper, more vibrant, and catches a potential buyer’s eye.
5.4 Selecting & Applying a New Background
Here’s the secret sauce that replaced my messy apartment floors with a classy, clutter-free background. We feed an LLM a prompt to rate a directory of images, then pick the top matches:
    class BackgroundSelector:

      def select_best_background_claude_v2(self, item, image_directory):

        # We prompt an LLM to rate each background from 1-20

        # Then we return the top 3 backgrounds

        ...

        return [top_background_1, top_background_2, top_background_3]
In app.py, the compositing step looks something like:
    for idx, bg_path in enumerate(st.session_state.top_bg_paths):

      try:

        # Composite with synthetic shadow

        composite_path = f"composite_option_{idx+1}.png"

        create_composite_with_shadow(

          bg_path,

          "sh_output.png",   # The enhanced foreground

          output_path=composite_path,

          shadow_offset=(30, 30),   # or tweak to your preference

          shadow_blur=25,           # bigger => softer shadow

          shadow_opacity=120           # 0-255 (0 = fully transparent, 255 = fully opaque)

        )

        preview_images.append(composite_path)
Now you can see your product shining in a curated environment—no more socks in the corner.
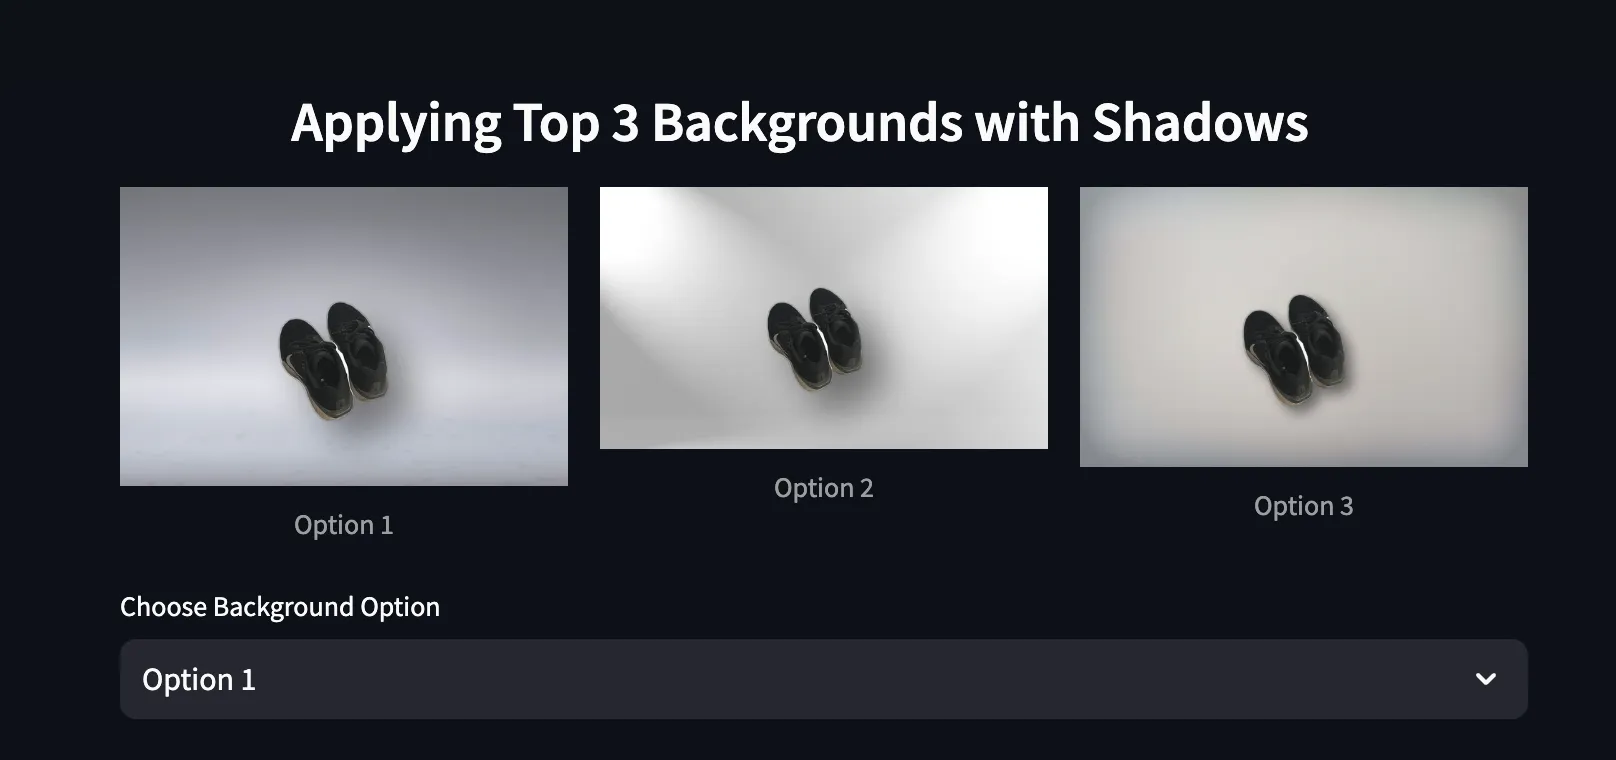
The secret to this final polish lies in compositing the images with a synthetic shadow:
    def create_composite_with_shadow(

      bg_path: str,

      fg_path: str,

      output_path: str,

      shadow_offset=(15, 15),

      shadow_blur=20,

      shadow_opacity=120

    ):

      """

      1. Remove background from the foreground image if not already RGBA.

      2. Create a shadow from the alpha mask.

      3. Paste shadow onto background, then paste foreground on top.

      4. Save final composite to `output_path`.

      """


      # Load foreground, remove BG

      fg_img_raw = Image.open(fg_path).convert("RGBA")

      fg_img_clean = remove(fg_img_raw)

      fg_w, fg_h = fg_img_clean.size


      # Create a new composite base with the same size as BG

      composite = Image.new("RGBA", (bg_w, bg_h), (0, 0, 0, 0))


      # Paste the background

      composite.paste(bg, (0, 0))


      # Build the shadow

      alpha = fg_img_clean.split()[3]

      shadow = Image.new("RGBA", (fg_w, fg_h), color=(0, 0, 0, 0))

      black_img = Image.new("RGBA", (fg_w, fg_h), color=(0, 0, 0, shadow_opacity))

      shadow.paste(black_img, mask=alpha)


      shadow = shadow.filter(ImageFilter.GaussianBlur(shadow_blur))


      shadow_x = offset_x + shadow_offset[0]

      shadow_y = offset_y + shadow_offset[1]


      composite.alpha_composite(shadow, (shadow_x, shadow_y))

      composite.alpha_composite(fg_img_clean, (offset_x, offset_y))


      composite.convert("RGB").save(output_path, format="PNG", quality=95)

      return output_path
6. The Streamlit Frontend
The app.py file is a standard Streamlit script that ties these steps together. You’ll find logic such as:
    if start_action and not st.session_state.processing:

      # 1. Detect objects and caption

      results = detect_objects(image_path)


      # 2. Segment the main product

      result_sam = segment_and_save_objects(image_path, "...")


      # 3. Enhance the product

      sharpened_image_path = auto_enhance_image_simple(...)


      # 4. Use LLM to pick top backgrounds, composite them

      background_selector = BackgroundSelector()

      st.session_state.top_bg_paths = background_selector.select_best_background_claude_v2(caption, BG_DIR)


      # 5. Show user the final images and let them pick

      ...
- A file uploader or sample images
- A “Start Action” button that triggers the pipeline (detection → segmentation → enhancement → background suggestion → compositing).
- Image previews so you can pick which background you like best.
- A final “Buy Now!” style caption from the LLM.
Within a few clicks, you have:
- Clean, professional-looking product shots.
- Ready-to-use marketing text for your listing.
7. Why VisionAgent?
Initially, I was bouncing between rembg, various Hugging Face repos for segmentation, random captioning scripts, and so on. VisionAgent changed the game:
- Single Unified API: No need to track multiple model endpoints or repos.
- High-Quality Models: Florence 2 and Qwen2-VL produce top-tier detections, masks, and captions.
- Ease of Use: A few function calls take you from messy photos to a polished composite.
- Production Ready: You can go beyond prototypes—use VisionAgent’s efficient model inference for a robust online service. And if you need more customization or want to fine-tune models, you can work directly with LandingAI’s team and platform.
8. Real-World Impact (and What’s Next)
Armed with a near-instant way to create eBay-worthy shots, I posted my items with better visuals—and sure enough, they started selling faster. The difference in click-through rates and buyer interest is tangible once you present your product well.
This approach isn’t limited to dusty apartments, either. With a little tweaking, you can:
- Fashion: Snap a messy picture of a t-shirt on your bed, remove it, and put it on a model or a clean, photogenic background.
- Real Estate: Stage rooms virtually, removing old furniture and dropping in fresh sets.
- Social Media Marketing: Auto-generate promotional images with your brand’s color-coded backgrounds.
You get the idea—once you can seamlessly unify detection, segmentation, and text generation, the sky’s the limit.
9. Ideas for Further Improvement
If you want to supercharge this app, here are some ideas:
- Batch Processing: Allow users to upload multiple images at once and queue them for background removal and enhancement.
- Interactive Object Editing: Let the user refine or erase minor segmentation errors with a paintbrush interface.
- Caption Customization: Provide multiple marketing styles—“quirky,” “formal,” “luxury,” etc.—and let the user pick.
- Automated Cropping & Positioning: Automatically center or crop the product for consistent composition across images.
10. Wrapping Up
From a clutter-ridden apartment to a polished eBay listing machine, this journey shows how VisionAgent unlocks next-level visual AI with minimal fuss:
- All-In-One: Tools like detection, segmentation, captioning, and image reasoning under one roof.
- Production Ready: You can go beyond prototypes—use the VisionAgent API and custom model training features for building robust, economical online services. If you need more flexibility or custom model training, get in touch with me.
Give it a spin! In just a few hours, you’ll have your own AI-driven “background replacement and product enhancement” app—no advanced AI knowledge necessary, no background needed in image processing or computer vision. The full code is in our repository and can be cloned locally to run right away. Armed with these tools, you no longer have an excuse for dingy, unappealing product photos. Now, go sell your gear—and let those mismatched socks remain a hidden secret of the “before” times!
Happy building! And remember, if you need deeper integration or have special requirements, the VisionAgent discord community and LandingAI team are eager to help.