

Estimate How Many Sips of Coffee You Take
In this tutorial, we are going to use a computer vision deep learning model trained in LandingLens to create a simple coffee mug detector using our computer webcam, so we can count how many times we sip coffee while working.
As an end-to-end platform, LandingLens offers its own cloud endpoints. However, we are going to run inference on the edge, using our own local computer—even leveraging our GPU!
Why Run Inference on the Edge?
If you ever deployed any application using a serverless cloud provider (Firebase, AWS Lambda, Google Cloud Functions, Microsoft Azure Functions… you name it!), you know that cloud deployments have many benefits: faster deployment times, less worry with hardware scalability, availability, etc.
The same principle applies to deploying a computer vision model using LandingLens endpoints: once you train and deploy your model using LandingLens endpoints, you simply don’t worry about which framework the server runs, how LandingLens makes sure the model will be available, or how it scales to serve all the requests you send.
But what if networking overhead is a concern? What if you need near real-time inferencing? What if every millisecond counts?
In that case, you probably need LandingLens Docker Deployment, which is a Docker container with your model embedded, so you can use the model anywhere you need it. This way, you can run inference in any network (your notebook’s localhost, or an on-prem Kubernetes cluster, for example), saving precious time and allowing your model to reach higher throughput.
Prerequisites
In order to run predictions locally with LandingLens Docker Deployment, you first need to install Docker Engine.
In addition to Docker, you will also need:
– Your LandingLens API key
– A deployment license for Docker Deployment
– The LandingAI Python Library, which you will use to run inference via API
API Key
You can get your existing API key or create a new one in LandingLens: click the \ top-right corner menu and select API Keys. For more information, go to Retrieve API Key.

Deployment License
For the LandingLens Docker Deployment deployment license, you can generate a free trial license directly from the container itself, by running the “trial-license” command with your API key:
docker run --rm public.ecr.aws/landing-ai/deploy trial-license --apikey API_KEY
Where API_KEY is your own API key.
The command above downloads the LandingLens Docker Deployment image and runs the trial-license command, which outputs the following in your console:
[INF] Retrieving trial license
[INF] [Licensing] Requesting trial license
[INF] [Licensing] New license provided: [LK-AAAAAA-BBBBBB-CCCCCC-DDDDDD-EEEEEE-XX]
[WRN] [Licensing] License will expire soon!
[INF] [Licensing] License will expire in approximately [13, 23, 59] (days, hours, minutes)
Next to the “New license provided” message you will find the deployment license in the format “LK-AAAAAA-BBBBBB-CCCCCC-DDDDDD-EEEEEE-XX”. Copy this license.
Keep in mind that the first time you run a command using public.ecr.aws/landing-ai/deploy image, Docker downloads that image from the registry. This download might take a while on slower networks, but it only happens the first time you run the command.
Train a Model
Now that we have our deployment license to run LandingLens Docker Deployment locally, let’s follow the basic steps to train a model. Let’s first create an Object Detection project in LandingLens, and label some images captured by the webcam.
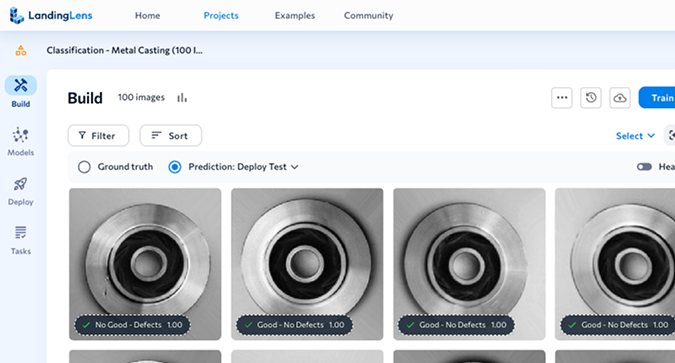
The following screenshot shows that I’ve updated and labeled 15 images. I’ve included images of the coffee mug in different positions, backgrounds, and light conditions. I’ve also included images with no coffee mug at all. Each purple box is a label I added to indicate the location of the coffee mug. I’ve named the class (label) as “coffee-mug”. Remember the “coffee-mug” class, because we will use it when running the model later.

This amount of data is enough to train a model to find coffee mugs in images captured from my webcam. Let’s now hit the button and wait for the model to learn the examples we’ve labeled.

In my case, LandingLens trained the model in only 1:15 minutes. Once the training is done, deploy the model as an edge deployment. To do this:
1.- Click on the Deploy button and name the model you’ve just created.

2.- Select Edge Deployment and click Generate Deployable Model.

Once LandingLens generates the deployable model, it redirects you to the Deployment page, where your new model is listed. Click the Copy Model ID button (see below) to save the Model ID. You will need this ID to spin up your local Docker Deployment container in the next section.

Spin Up a Docker Deployment Container
Now that you trained your model and copied the model ID, it’s time to spin up the Docker Deployment container locally to host your model. To do so, run the following command:
docker run -p 8000:8000 -e LANDING_LICENSE_KEY=LICENCE_KEY --rm public.ecr.aws/landing-ai/deploy:latest
run-model-id --apikey API_KEY --m MODEL_ID
Where MODEL_ID is the odel ID you copied in the previous section, and LICENCE_KEY and API_KEY are the values you got from the Prerequisites section above. This “docker run” command downloads your model and runs it on port 8000. Once it is ready, you will see the following message in your console:
Model loading status: [Ready]
Now, you can run inference in your Docker Deployment container using the LandingAI Python API.
Run Inference Locally with Landing APIs
From the point of view of the LandingAI Python APIs, running inference on a local Docker Deployment container is as easy as running it in the cloud. First, let’s follow the LandingAI Python APIs docs and install the library by running pip:
pip install landingai~=0.3.0
Then, create a quick script to acquire images from your webcam. Let’s save the script as “mug-detector.py”:
from landingai.pipeline.image_source import Webcam

with Webcam(fps=5) as webcam:
    for frame in webcam:
print(frame)When you run the “python mug-detector.py” script, information about each frame captured in the webcam prints in the console. This is not so useful yet, but it’s important to make sure the image acquisition is working.
Let’s now change that mug-detector.py script to actually run inference and check if our webcam frames have any “coffee-mug” objects (as a reminder, “coffee-mug” is the class we assigned to image labels earlier):
from landingai.pipeline.image_source import Webcam
from landingai.predict import EdgePredictor

predictor = EdgePredictor("localhost", 8000)
with Webcam(fps=5) as webcam:
    for frame in webcam:
        frame.run_predict(predictor=predictor)
        if "coffee-mug" in frame.predictions:
           print("A coffee mug was detected!")
        else:
print(frame)Simple enough, right? Try holding your mug in front of your webcam for a few seconds, and then removing it to double-check that the model is working.
If everything looks good, let’s turn this script into a “coffee sip estimator”, to see how many times your coffee mug enters your webcam frame—and potentially, how many coffee sips you took:
from landingai.pipeline.image_source import Webcam
from landingai.predict import EdgePredictor

predictor = EdgePredictor("localhost", 8000)
total_sips = 0
is_sipping = False
with Webcam(fps=5) as webcam:
    for frame in webcam:
        frame.run_predict(predictor=predictor)
        if "coffee-mug" in frame.predictions:
            if no is_sipping:
            total_sips += 1
            print(f"Total coffee sips: {total_sips}")
        else:
print("No coffee mug detected")Every time the coffee mug appears in front of the camera, the script updates and prints the total sips you did. Cool, right?
Run Inference on a Local NVIDIA GPU
In the example above, you learned how to run inference using the Docker Deployment option, but you may have noticed that the Docker Deployment container was running inference using the CPU, which is typically slower for this task. In my personal experience with this example , running inference on the CPU in my local machine takes about 1s, which makes the fps=5 parameter of the Webcam constructor kind of useless: there is no point in trying to capture 5 frames per second if we can only process inference at 1 frame per second rate, right?
To solve that, LandingLens Docker Deployment comes with the option to run inference on GPU instead of CPU, which is a game changer. My local GPU (an NVIDIA Quadro T1000 from 2019… not a super modern one) runs inference on a single frame in 200ms. This means that I can achieve the goal of running inference at 5 frames per second.
To run Docker Deployment using GPU, include the “--gpus all” flag when spinning up the container:
 docker run --gpus all -p 8000:8000 -e LANDING_LICENSE_KEY=LICENCE_KEY --rm public.ecr.aws/landing-ai/deploy:latest
run-model-id --apikey API_KEY --m MODEL_IDA few log lines after the model download, you should see a message similar to this one, confirming that you are using your GPU to run inference:
[INF] [87654321-abcd-ef01-ab12-abcdef123456] Using CUDA
In case you don’t see this message, double-check that the NVIDIA Container Toolkit is installed.
Conclusion
There are a lot of use cases that require running inference in the edge, closer to where the images are acquired. There are also many use cases that require running inference on several frames per second. In this tutorial, you’ve learned how to achieve that with LandingLens Docker Deployment and the LandingAI Python APIs. In this example, you built a coffee sip estimator using fewer than 20 lines of code!
To learn more Docker Deployment, visit our Support Center and check out our APIs documentation.