


Successful machine learning applications rely on high-quality labels. In the Automated Visual Inspection (AVI) domain, labels are signals provided by humans to teach models:
- How to recognize a particular defect class of interest
- How to highlight the defective area
What is Data Labeling
By definition, data labeling is the process of manually annotating content, with tags or labels. We refer to the people adding these labels as labelers. In the field of computer vision, the label identifies elements within the image. The annotated data is then used in supervised learning. The labeled dataset is used to teach the model by example. Data labelling is critical in the success of the machine learning mode. Flaws in the labels can lead to lower success rates of the model.
Through labeling, we want to distill the knowledge of a Subject Matter Experts (SMEs) with decades of experience into machine learning models. These models can be replicated to tens or hundreds of production lines to support the large-scale visual inspection process. The better signals the human SMEs provide, the more accurate the output model becomes.
There are different types of data labeling, based on the use-cases. In an object-detection task we are interested to not only know the class of target objects, but also their locations. Therefore, we draw bounding boxes around the target objects in the images. There are also image classification, semantic segmentation, and instance segmentation tasks. We label with classes, segmentation maps, and instance segmentation maps, as shown in the image below.
")
Common types of labels for computer vision tasks including image classification, object detection, semantic segmentation, and instance segmentation.
Machine learning engineers (MLEs) will collaborate with labelers to create labels on their datasets. To help labelers perform the labeling tasks accurately, MLEs will prepare a labeling book that provides accurate description of the target classes and detailed instruction on how to draw labels on images for image classification. In the automated visual inspection (AVI) domain, the labeling book is also called the defect book.
Challenges to AI Data Labeling in Computer Vision
From our past experience with AI data labeling, we observed two key challenges on labeling in AVI:
- The number of defective samples is relatively small compared to research datasets like ImageNet and COCO.
- SME’s judgement on defective samples is not consistent.
Few Defective Sample Images
Modern quality control procedures have reduced the defect rate in the inspection line below 1%. For some rare defect classes, a defective sample may only show once per million. As a result, only a small number of unique samples per defect class can be collected by model iterations.
Defect classes in manufacturing are not commonly seen in daily life. Sometimes a defect is defined as “3 cm long gap” or “hair-like scratch at the top left corner reflecting light”. They are much more difficult to label than a cat, a dog or a motorcycle. It usually takes months or years for SMEs to develop their heuristics to recognize those defects in production lines.
Inconsistent Labeling of Image Data
For the same defective sample, different SMEs may have different opinions regarding the type of defect present in the image. Furthermore, the same SME might judge differently depending on the day or time.
Traditionally, deep learning research teams handle such inconsistency by collecting a massive number of samples from a big label team. The misalignments are averaged out over the larger set of data.
However, as we pointed out in the first issue, our number of sample data is very limited. The time to train a large team of SMEs is too costly. Therefore, we need some other method to eliminate the inconsistencies.
Below is an example image showing the unambiguous defects vs ambiguous defects in visual inspection.
Credit: image is from the Batch newsletter https://www.deeplearning.ai/the-batch/issue-65/
Obtaining Consistency in Data and Imaging Labeling Tools
Landing AI has developed a process to solve the two challenges above. It includes a few key steps, which we’ll cover in detail.
- Create a defect book
- Establish Defect Labeling Consensus
- Review Data Labeling for Quality Assurance
Create a Defect Book
The defect book provides a list of key defects and their clear definitions, paired with some sample images. It provides a reliable and trustful source of ground truth. The defect book provides readers an accurate unambiguous description of defects. When there are questions like “should this area in the image be considered defective?” or “is this prediction of the model correct?”.
From our past experience, creating an accurate and complete defect book is one of the most important requirements of successful AVI projects. You record the formal definition of defects in a defect book to quickly train a new labeler to correctly capture defects.
The process of creating a defect book is to extract all heuristics from experienced SMEs’ minds and put them down on paper. Differences between SME’s judgement and the defect book will lead to labeling mistakes. When the defect book is complete enough, you can train new labelers to quickly reach SMEs’ knowledge level of those defects.
Below we describe the key elements that go into creating a defect book.
Document the Project’s Background and Terminologies
First, the overview of the project background and terminologies. From our past experience, many first-time practitioners ignored this step of describing the background and went directly to list out defects. However, we have found that a detailed description of the project background and the purpose improves the communication with labelers and makes them more attentive to the regions of interest or differentiating between critical defects and noise.
Most AVI projects have special foreground and background composition or domain-specific terminologies. It helps readers understand by introducing the key terminologies and explaining the image layout in the beginning of the defect book.
")
Example battery inspection: explain the composition in the image.
")
Example steel surface inspection: explain which area in the image the labelers needs to inspect for defects.
Specify Each Class of Defects
Each section of the defect book should provide an accurate description of a specific type of defect. Include its major visual patterns and where it may appear in an image. We find it extremely effective for understanding the defect by providing sample images that represent the majority of the defects, both the common ones as well as some edge cases.
It is useful to include some counter-examples of images with similar patterns but are not valid defects. This helps labelers correctly determine one class of defects apart from others.
If a defect consists of a few distinctive looks, then to avoid confusion create a few subsections to introduce them separately.
Provide Clear Instruction on How to Label Defects
We have seen a few customers take this for granted. They start labeling without defining a clear set of labeling instructions. As a result, the labeling quality is very poor with large inconsistency among different labelers. This problem can be avoided by defining a clear labeling book in the beginning.
If you are drawing bounding box or segmentation labels, here are recommended best practices:
Draw labels tightly around the target objects
The models will be penalized or rewarded based on how well their predictions are matched with the labels by pixels. If you keep unnecessary margins between the labels and the objects, you will misguide the model.

Example: draw bounding boxes tightly around the objects.
Label each target object individually
You may encounter scenarios when there is a cluster of small, target defective objects close to each other. Labeling each object with individual bounding boxes will cost time and make it difficult for your model to fit with each ground truth label precisely. Instead, draw a big bounding box that covers the cluster of defective objects. Create heuristics on when to draw a single bounding box and when to draw separate bounding boxes. Keep this consistent among labelers.

Example: draw bounding boxes for each of the defects separately.
Defect Books Should be Updated Frequently
Keep your defect book updated, so that all of your labelers will have the latest knowledge about the defects. When you have a new defect type or edge case sample, it’s time to update the defect book.
Establish Defect Labeling Consensus
After creating a defect book, quickly test its accuracy and coverage before labeling all the data. If there’s incorrect definition or edge cases not covered sufficiently in the defect book, capture these issues early. Rely on the defect consensus to evaluate whether people are aligned on their defect definitions and labeling.
Typically you will have three people participate in a defect consensus task. We ask both the SME and new labelers to label the same set of defect samples by referring to the defect book. It helps us surface up any possible misalignments. The recommended composition is to have one SME, one labeler, and one Machine Learning Engineer (MLE) or an additional labeler. The SME will label based on their knowledge as well as the defect book. Whereas the other participants will rely entirely on the defect book’s instruction, since they don’t have much domain knowledge.
We highly recommend having the MLE participate in this process. The MLE will get more context on the labeling rules and better understanding of the defect definitions by involvement in the defect consensus task. Later when analyzing model errors, the MLE can quickly tell if an error is due to ambiguities in the defect book. This is the most common type of error we’ve seen.
We recommend randomly picking 10 samples per defect from the entire dataset. This allows you to examine all the defect classes and cover major pattern types within each class. Then ask each participant to label these samples independently.
Once the participants are finished, an agreement score will be calculated for each image. Inside Landing AI, we have developed an internal scoring system that covers all the labeling types and offers it as an image labeling tool to all of our users. For classification labeling, the agreement will be calculated based on the class given by participants. For object detection and semantic segmentation labels, the agreement score will be calculated with both the class and region labeled by all participants.
An overall consensus score is calculated by aggregating the agreement scores of all images. It tells you how well your participants are aligned with each other. This reflects how accurate and complete the defect book is given the sample dataset. For images that achieve very low agreement scores, discuss with SMEs the root cause of misalignment. Once you identify the source, update the corresponding section in the defect book. Add the image as a data labeling example if needed.
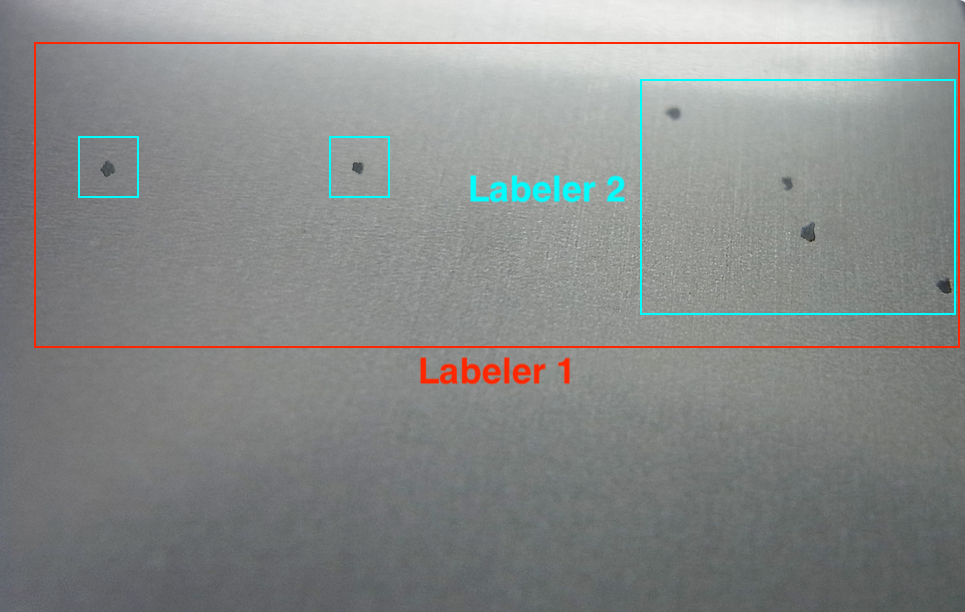
Illustration of how labelers drew their bounding boxes differently.
Establishing a defect consensus is not a one-time task. Everytime the defect book is updated, or a new labeler is added to the project, do a defect consensus. This ensures your labelers reach sufficiently high alignment on their understanding of the defect book.
Review Data Labeling for Quality Assurance
Finally, you are ready to start labeling all of our data. To ensure the quality of your labels, there’s usually a review process. This way only the approved images will be released to the next step. That’s when model training and evaluation occurs.
With an accurate and complete defect book, it helps you train labelers with SME’s knowledge without decades of exercise. Therefore, now you can afford to have multiple labelers working on your dataset. Two or more labelers are recommended for labeling the same dataset independently. For each image, assign multiple labelers to label and only accept labels with high agreement among all labelers.
After they finish, similar to what we did in the defect consensus, an agreement score will be calculated for each image. This is based on the class as well as the region, if available, labeled by all the participants. You can set up a minimum threshold to reject images with inconsistent labels automatically. Review the remaining images with agreement scores that are above the bar. By doing so, you can quickly review your labeled datasets and prevent any inconsistent labels leaked to the next step.
After they finish, similar to what we did in the defect consensus, an agreement score will be calculated for each image. This is based on the class as well as the region, if available, labeled by all the participants. You can set up a minimum threshold to reject images with inconsistent labels automatically. Review the remaining images with agreement scores that are above the bar. By doing so, you can quickly review your labeled datasets and prevent any inconsistent labels leaked to the next step.
Successful ML Projects Formalize Data Labeling
At Landing AI we observed how many projects took an unnecessarily long and painful process to complete. It was due to ambiguous defect definitions or poor labeling quality. In comparison, it will make the life of machine learning engineers much easier, and the whole project lifespan much shorter, by having a dataset with high quality labels. Therefore, it is very important to invest the time in the project’s early stage to clarify defect definitions and formalize labeling.
We iterated the data labeling process described above among our many projects. We formalized the defect definitions and introduced the heuristics from SMEs on how to recognize defects into the defect book. It is an important source of truth to train labelers as well as evaluating model predictions at the model iteration stage.
With defect consensus, we can examine the accuracy and completeness of the defect book. We can identify possible misalignments on the knowledge of defect definitions between labelers and SMEs. In the final labeling step, we have multiple labelers label the same dataset and then only approve images with consistent and unambiguous labels. Once this whole process completes, the data is then ready to be used for model training and evaluation.
")